Flex2B for Web oriented collaborators
Flex2B for Collaborators
An introduction to the Web based end-users.
Note. Screenshots will evolve for upcoming releases.
INDEX for this page. Multiple elements covered
1. BASIC OVERVIEW........
1.1 HOW TO ACCESS FLEX2B........
1.2 MENU STRUCTURE........
2. DUE DILIGENCE PORTAL – QUALITY CERTIFICATES UPLOAD........
2.1 CHECK GROWERS INFORMATION........
2.2 UPLOAD QUALITY CERTIFICATES WITH RESPECTIVE EXPIRY DATE........
3. STOCK UNIT CARDS CREATION AND DELETION........
3.1 CREATING AND PRINTING STOCK UNIT CARDS (PRODUCE CREATIONS)........
3.2 STOCK UNIT CARD DELETION (PRODUCE DEPLETIONS)........
3.3 STOCK UNIT ENQUIRY........
4. DELIVERY/ TO LOADOUT THE PALLETS IN FLEX2B........
4.1 TRUCK DELIVERY - EUROPE........
4.1.1 SET FIRMNESS........
4.1.2 TO LOADOUT THE STOCK UNITS IN FLEX2B (EUROPE)........
4.2 CONTAINERS DELIVERY - EXPORT........
4.2.1 TO LOADOUT THE PALLETS IN FLEX2B (EXPORT)........
4.2.2 TRANSPORT / SHIPMENT........
4.2.3 ASSIGN SHIPMENTS TO CONTAINERS........
4.2.4 STOCK UNIT COLLECTION / CONTAINER - STANDARD........
APPENDIX – SOME PORT IATA CODE LIST- DEPARTURE AND DESTINATION
1.1 How To Access Flex2b
Site link https://yourcompanyURI/flex2b
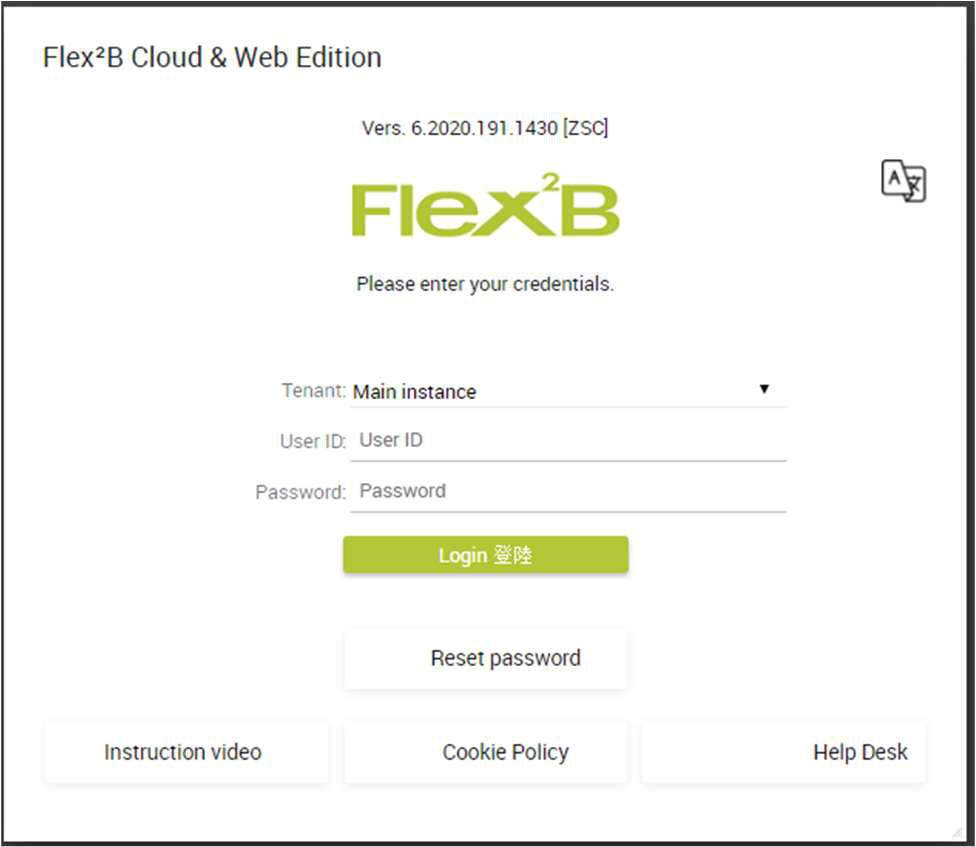
Enter USER ID and PASSWORD
Remember to treat your user ID and password confidentially to ensure the security of your data. Each packhouse will only be able to see its own data.
Click on the top left icon ![]() of the initial screen to access the main MENU.
of the initial screen to access the main MENU.
On the top right, you will find the icons to help you navigate the site.
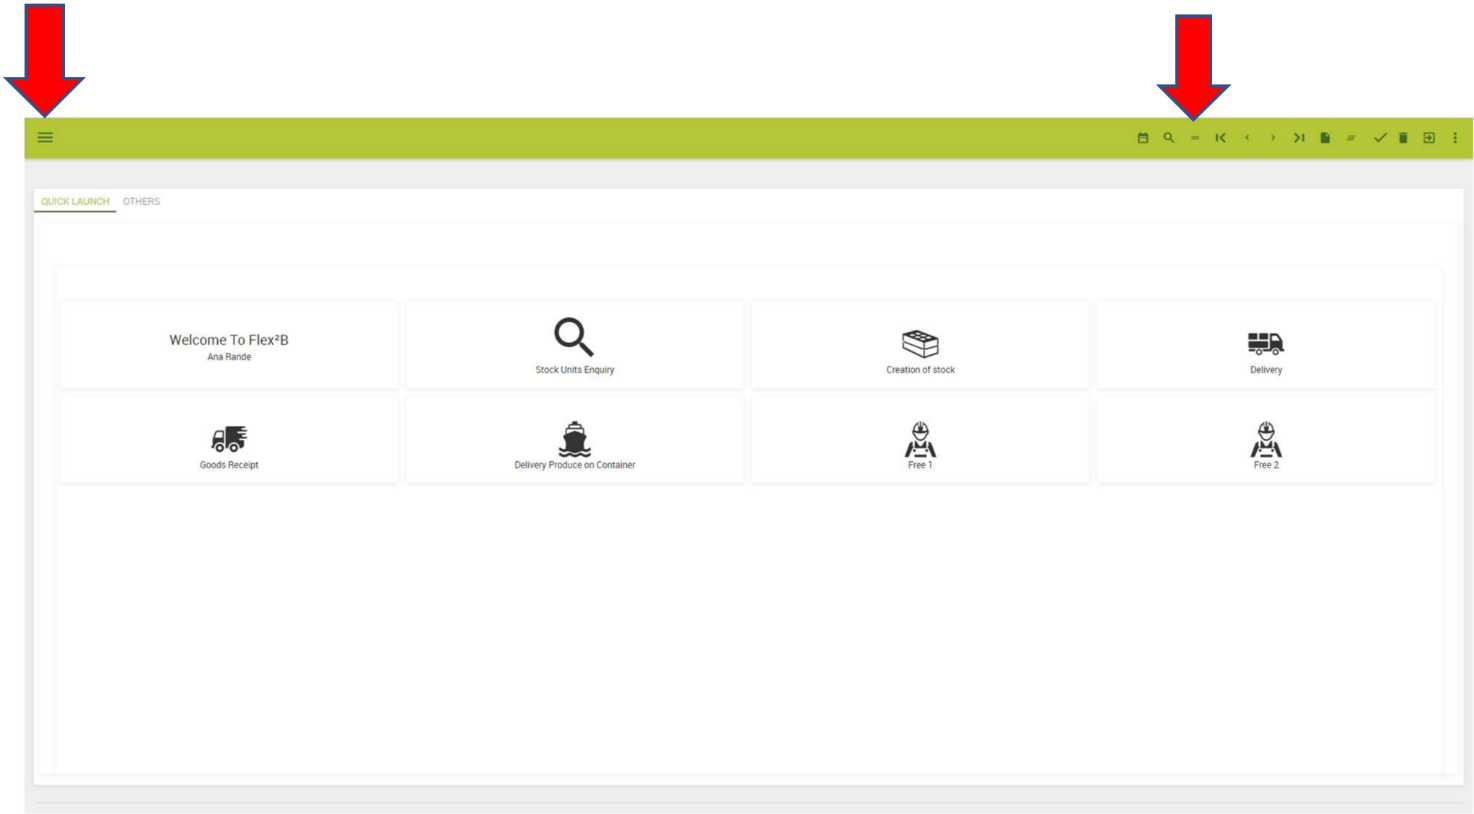
From to to bottom:
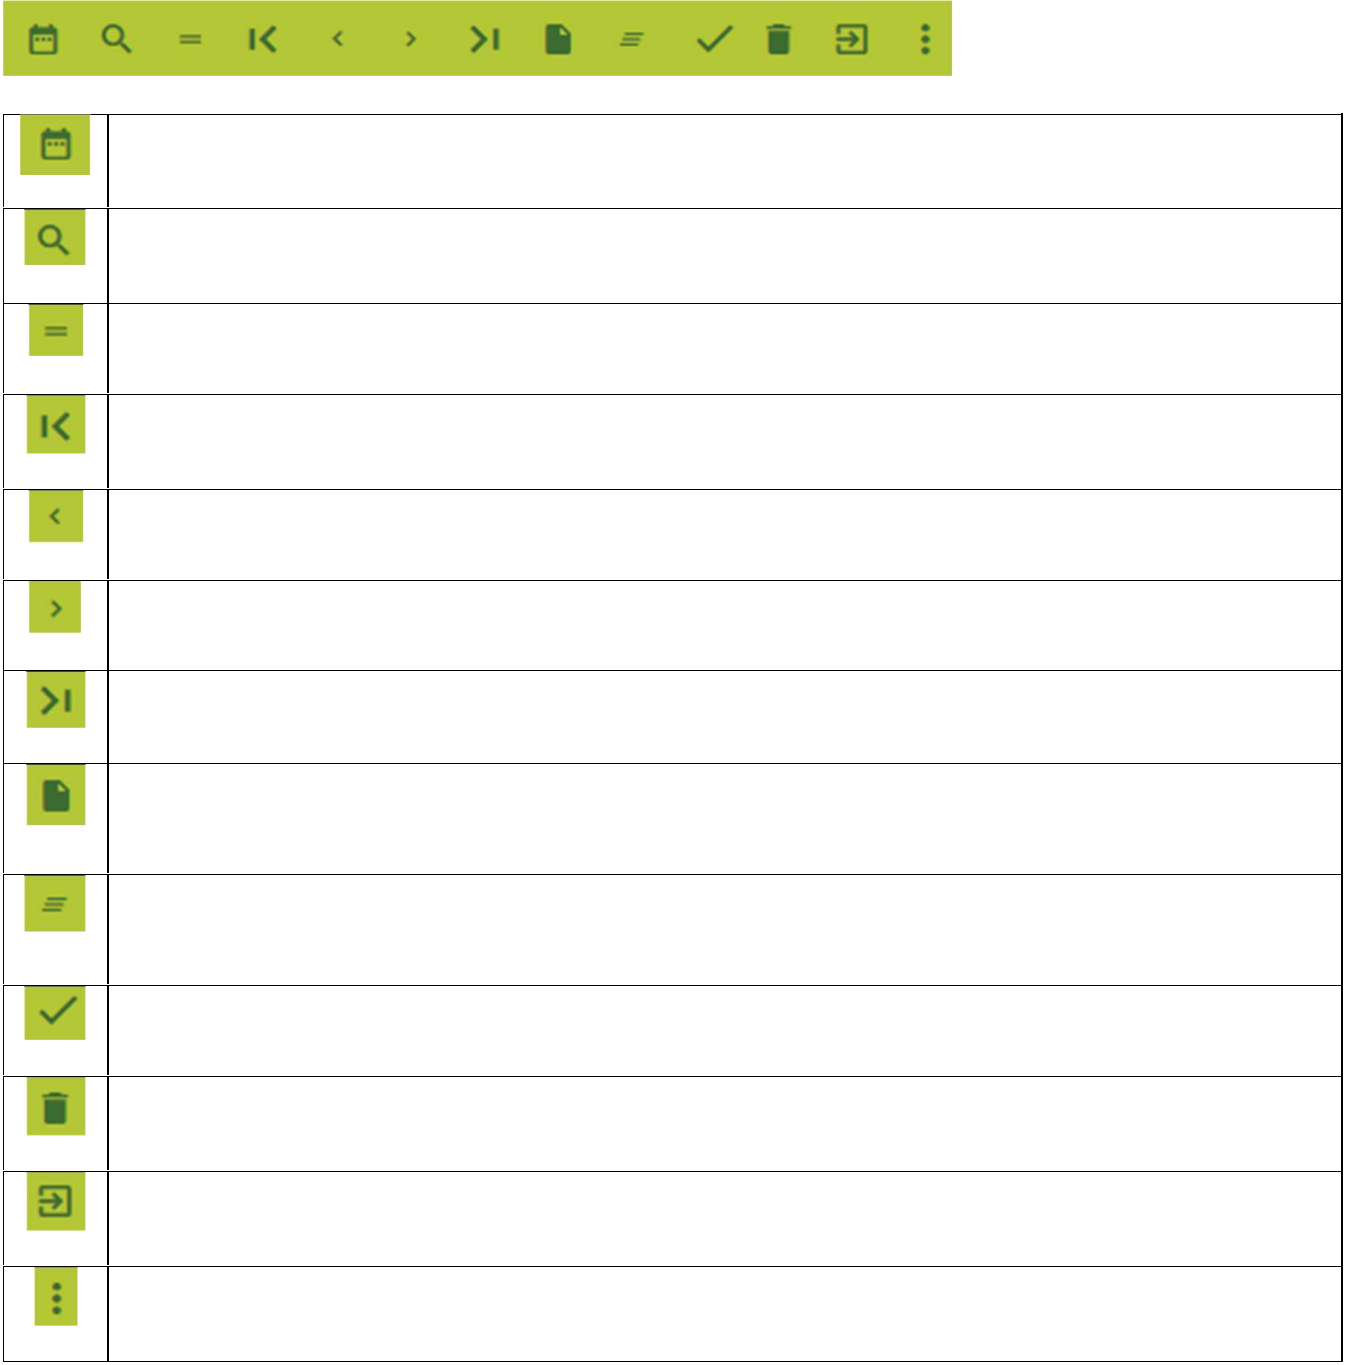
Dashboard
Search, lookup list
Find
Find First
Find Previous
Find Next
Find Last
Clear field, this clears the selected field and gets the view ready for the user to enter a new record.
Clear All, this clears all fields on the screen and gets the view ready for the user to enter new records.
Save
Delete
LogOut, closes the application and returns to the login screen.
More Options
The user can navigate the site by using the mouse or with the [Tab] & [Shift+Tab]-key on the keyboard to move to the next or previous cell.
2.1 Check Growers Information
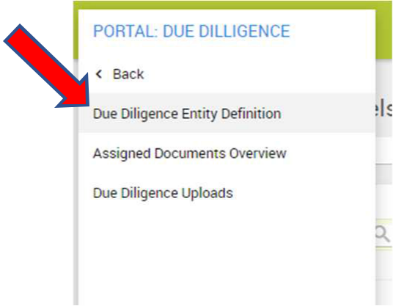
Go to MENU – PORTALS – PORTAL: DUE DILIGENCE - DUE DILIGENCE ENTITY DEFINITION
In the ‘Plant Entity Code’ field search for your supplier entity by clicking on the magnifying glass. Suppliers owning different packhouses, will have all their Growers under the same ‘Plant Entity Code’. This code will be given to suppliers at the start of the season.
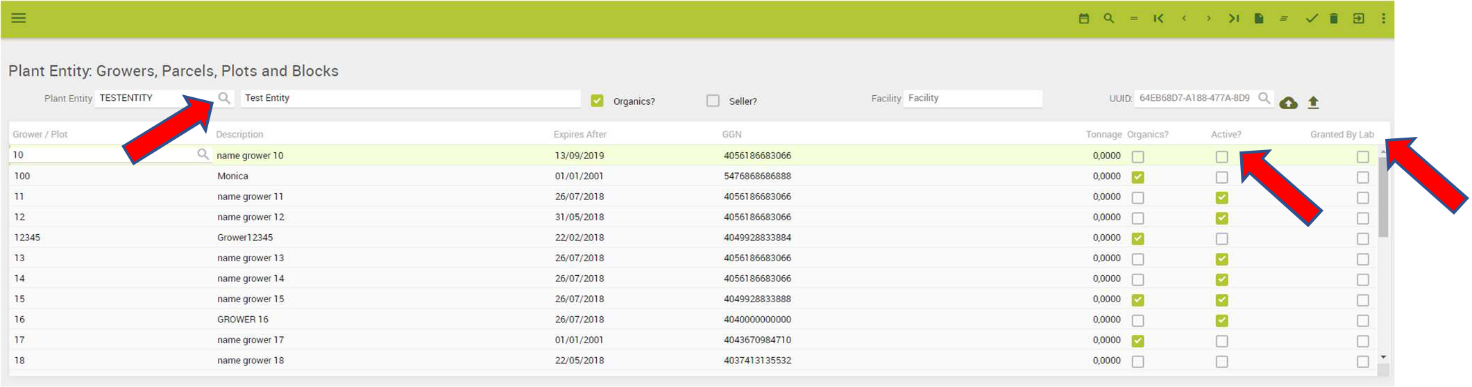
You should see the list of Growers that are provided to the Coop. Please check the list to make sure there are no mistakes or any Grower missing and insert/correct the GGN numbers if necessary.
To be able to create a Stock Unit Card for a particular Grower:
- the ‘Active?’ checkbox must be ticked – this means the certificates have been uploaded and are not expired.
- The ‘Granted By Lab’ checkbox must be ticked – this means the Coop has uploaded the lab results from the GIAS website and the Grower is authorized
2.2 Upload Quality Certificates With Respective Expiry Date
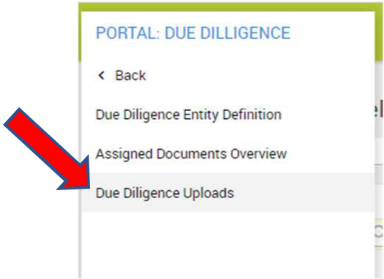
Go to MENU – PORTALS – PORTAL: DUE DILIGENCE - DUE DILIGENCE UPLOADS
The following window will open
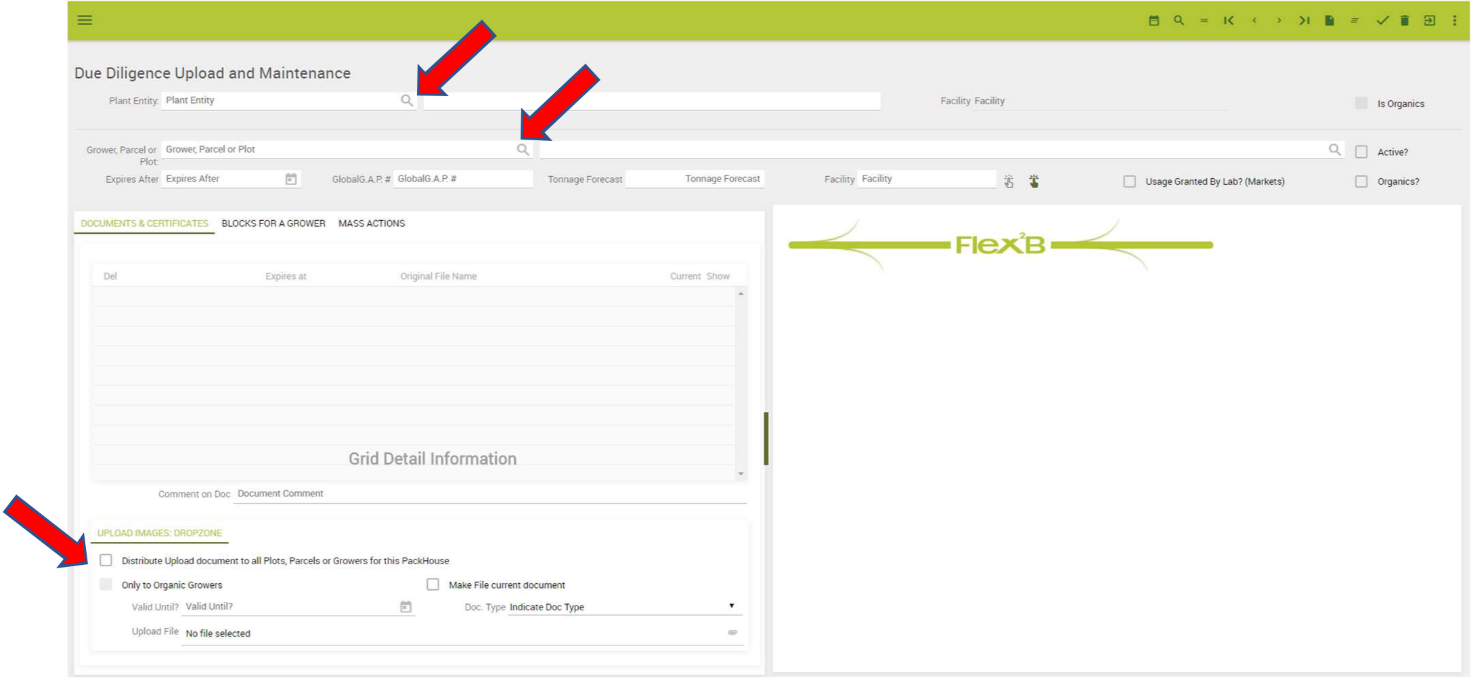
As shown by the first arrow in the example above, type or search with the magnifying glass the name of the Pack House in the ‘Plant Entity’ field. In the 'Grower, Parcel or Plot' field search the number of the Grower for which you want to upload the certification, or type the Grower number and then click on ‘=’ on the top right menu.
If the same certificate is applicable to all the growers of the entity, tick the ‘Distribute Upload document to all Plots, Parcels or Growers for this PackHouse’ box, as shown in the below example.
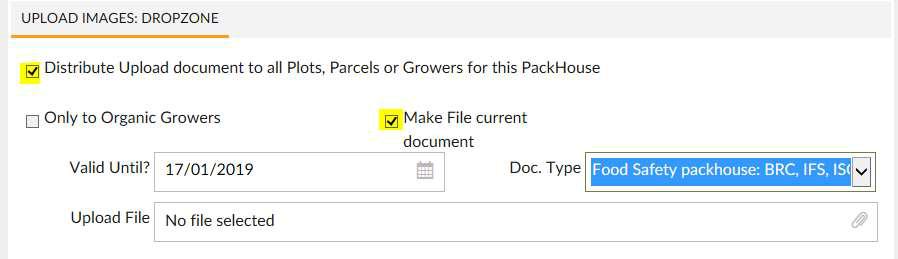
Remember to always tick the ‘Make file current document’ checkbox.
In case of organic “certification”, please tick the ‘Only to Organic Growers’ checkbox. This will upload the organic certificate only to the organic Growers.
Update the expiry date in the ‘Valid Until?’ field;
NOTE: The expiry date must be always entered before uploading the certificate.
In the ‘Doc Type’ field, select the type of certificate you would like to upload.
In the this example, there are 7 possible certificate types – only 2 are mandatory:
Mandatory certificates:
- BRC Certificate (including expiry date)
- Global GAP Certification (including expiry date)
The other 5 certificates are optional:
- Crop protection programme
- Customer seller Warranty declaration
- Long term declaration origin
- Grower List
- Organic certification
There are two different ways to load a certificate: by selecting and dragging the file into the designated area, as in the example below
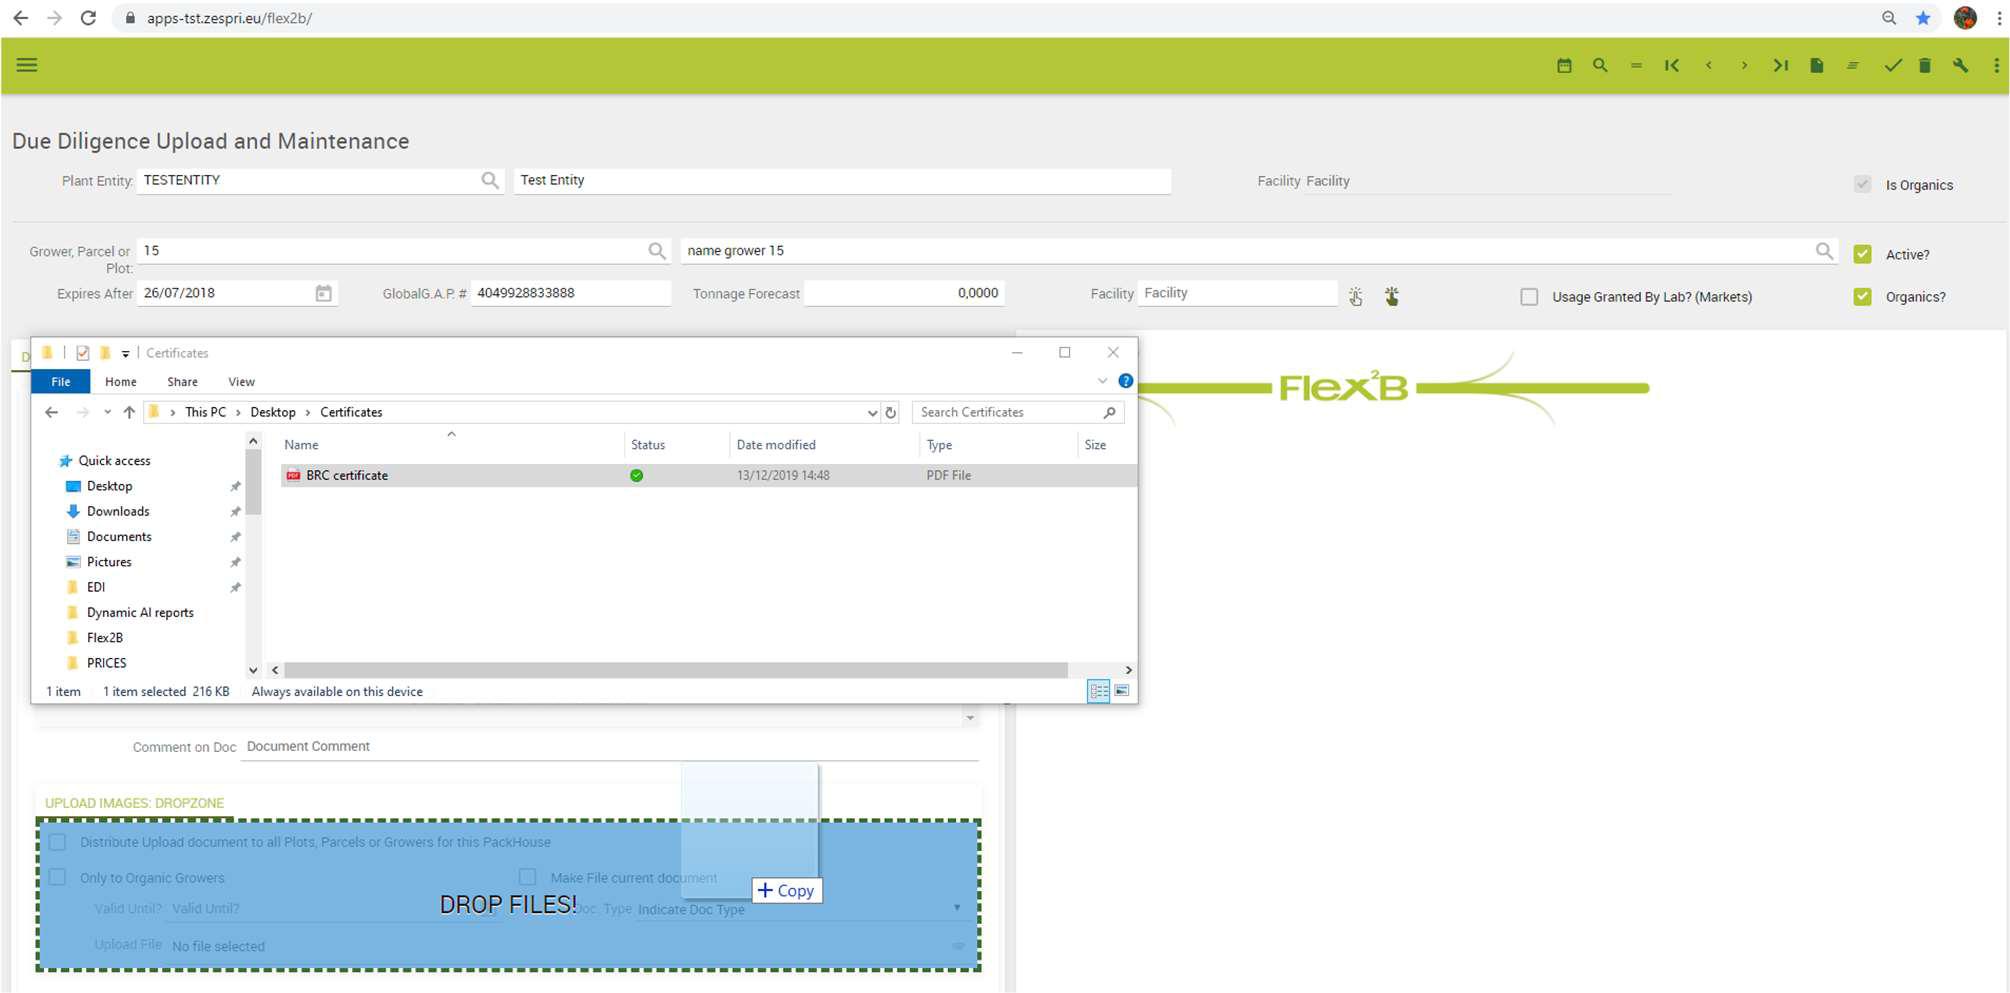
Otherwise, you can click on the attachment icon in the box indicated by the red arrow in the below example, search for the file in your computer and then attach it.
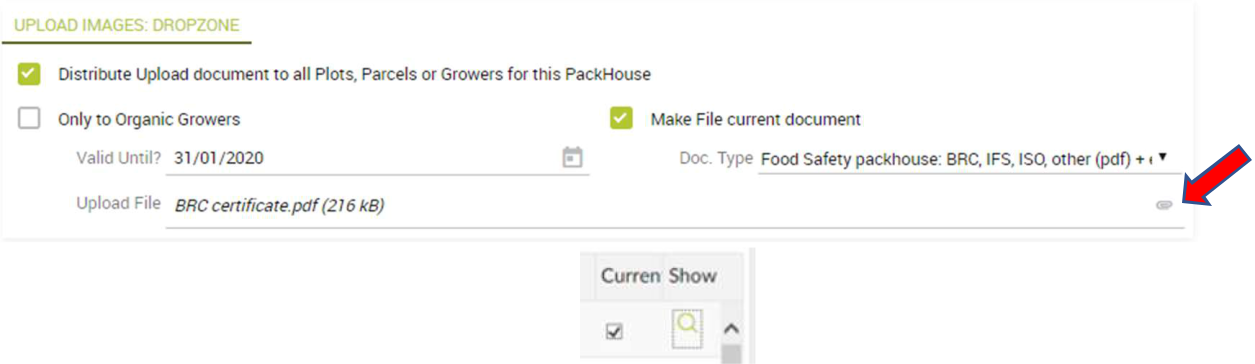
To preview the certificate, click on ‘Show’
To upload another certificate, simply tick the relevant boxes and update the expiry date in the ‘Valid Until?’ box according to the certificate. Choose the type of document and then click the attachment icon once again.
After every certificate has been loaded, click on the ‘Recalculate’ icons shown below so that the system can update the expiry date of the Grower – you will be able to create the Stock Unit Card until this date.
![]()
to update the date until which the grower can be packed
![]()
to update the expiry dates of all your Growers
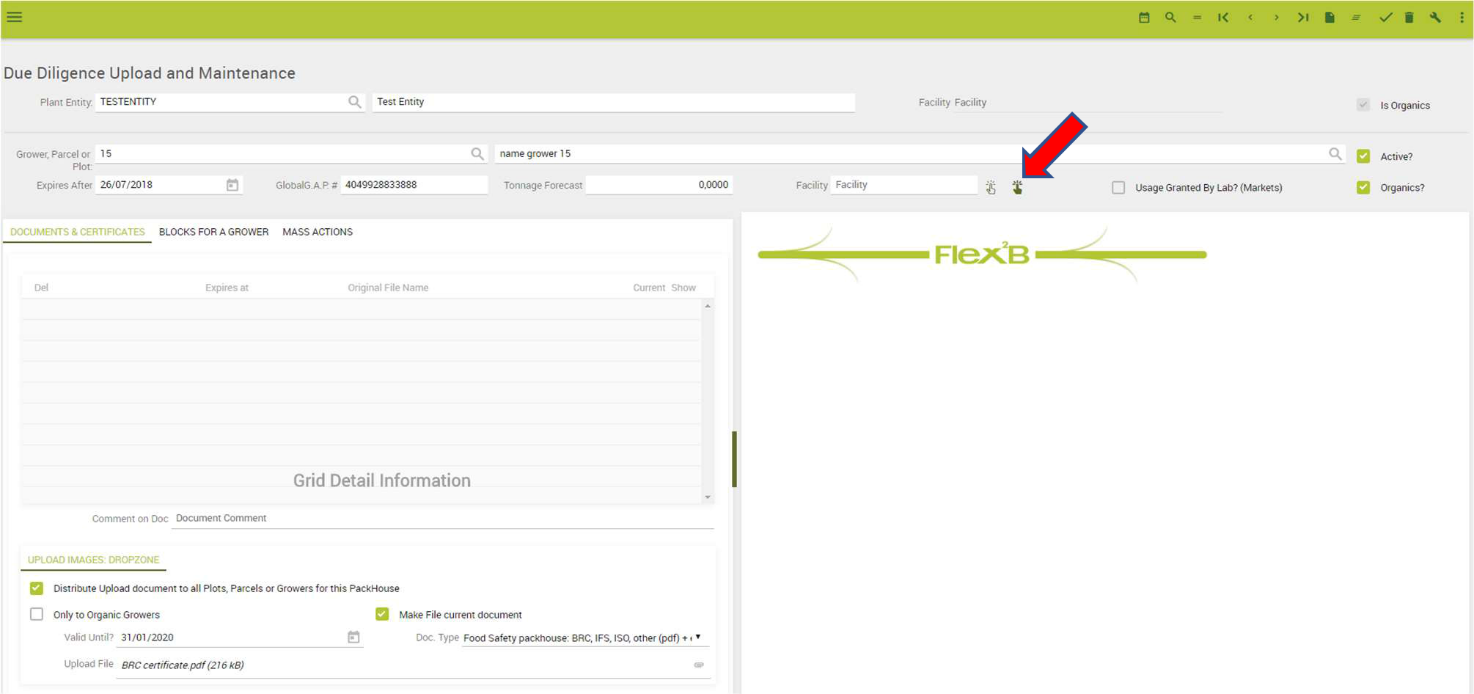
Each Grower must be chosen individually to upload the certificates.
Once you have uploaded all the certificates and updated the expiry dates, click on ‘Save’ to ensure that all the changes made have been captured correctly.
3. Stock Unit Cards Creation And Deletion
3.1 Creating And Printing Stock Unit Cards (Produce Creations)
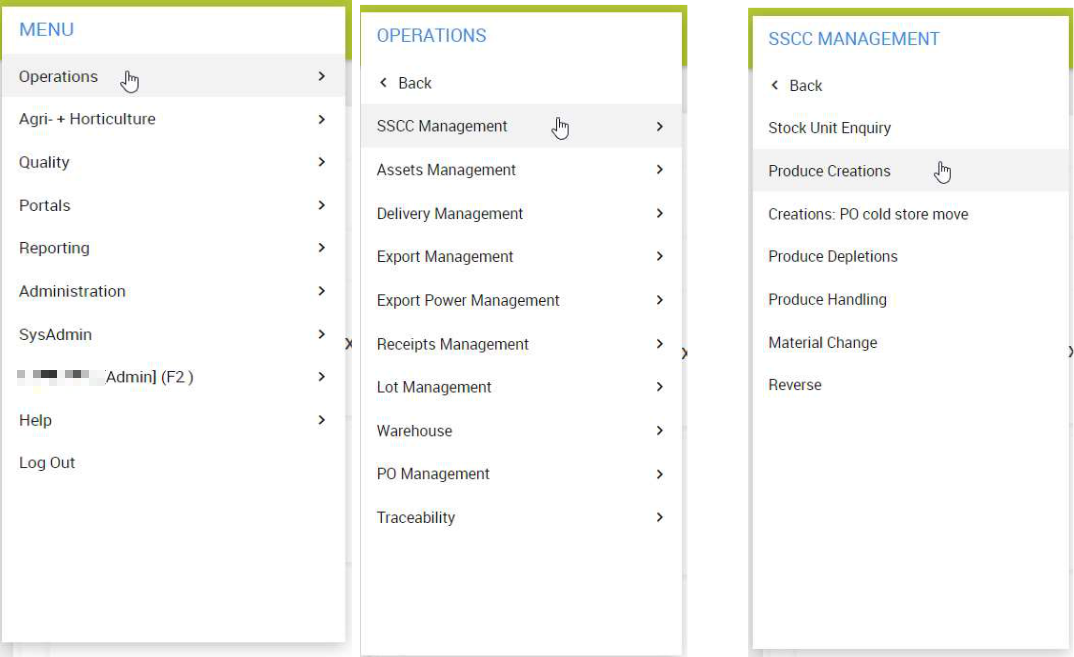
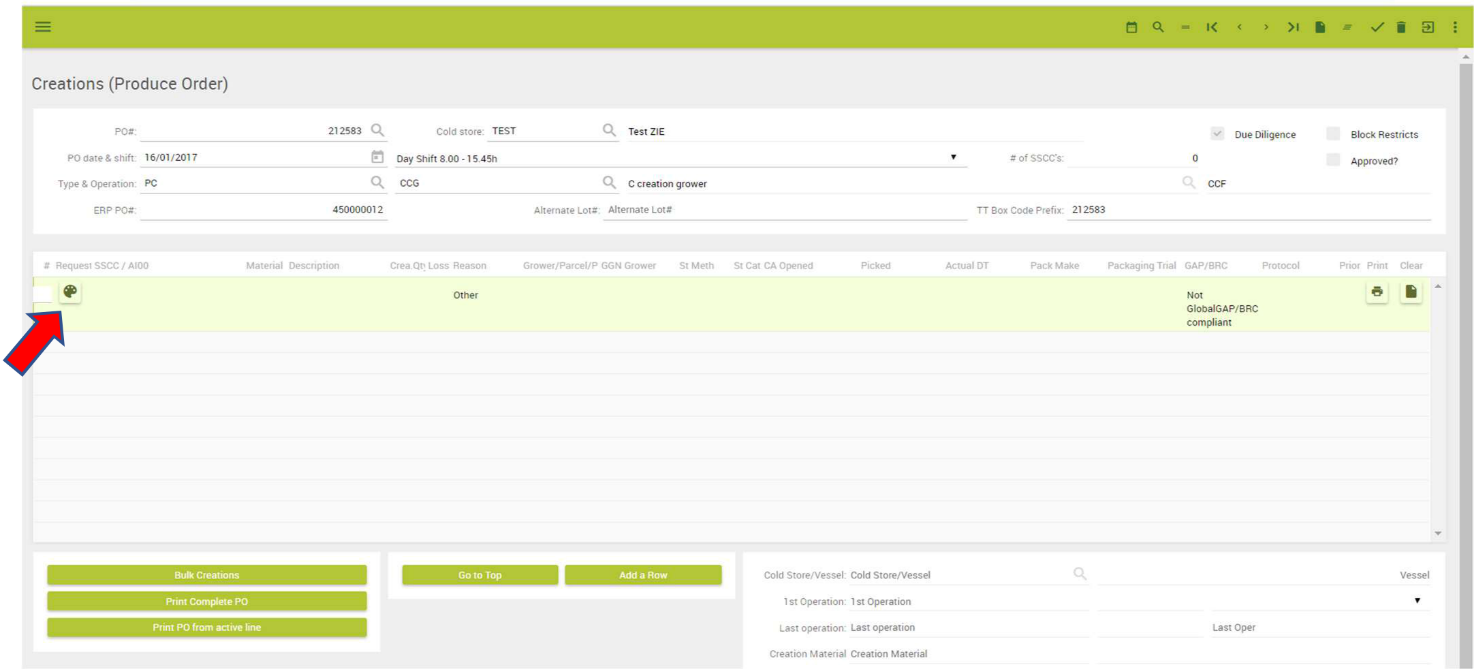
On the left MENU go to OPERATIONS – SSCC MANAGEMENT – PRODUCE CREATIONS
The following window will open.
Use the TAB key to navigate through the different fields.

Complete all fields
The PO# (Produce Order) will be provided automatically by the system.
Select the correct COLD STORE code by clicking on the magnifying glass and click on OK.
PO DATE & SHIFT: is the date of the creation of the Stock Unit Cards. The SHIFT is the working time during which the fruit has been packed but it is not compulsory to fill this field or modify it.
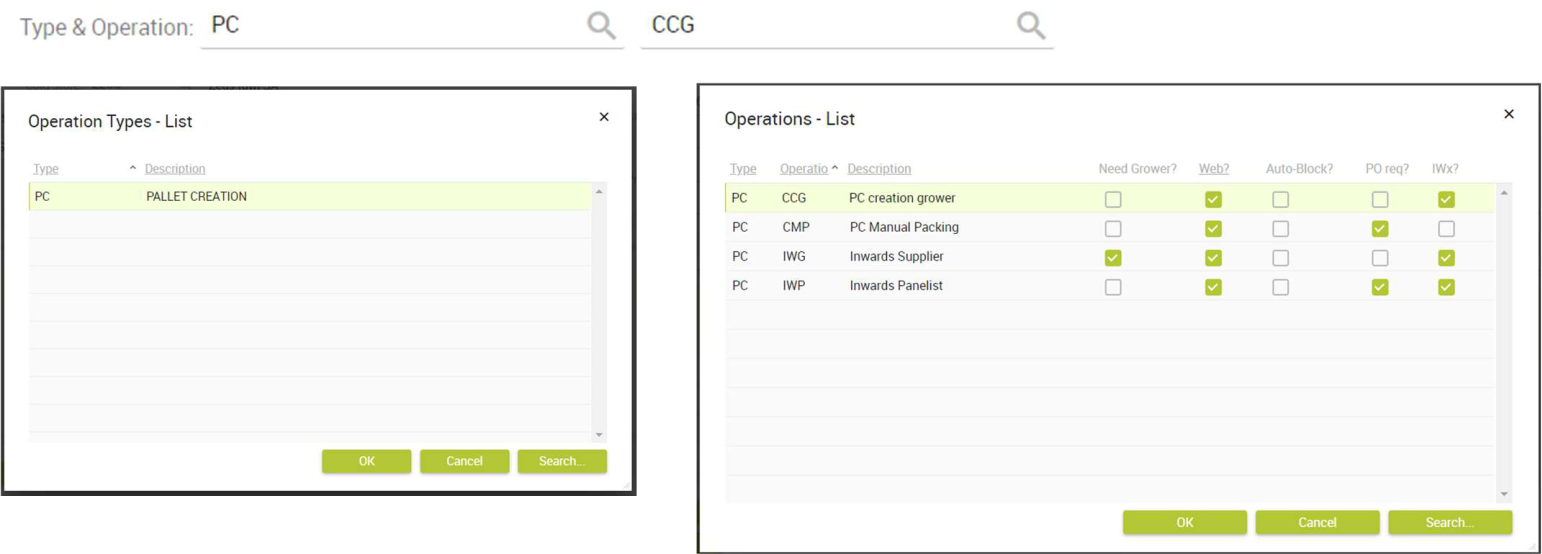
TYPE & OPERATION: Type PC (for Pallet Creation) or chose it from the dropdown list; in the following field chose or type CCG (C creation Grower)
ERP PO#: Type the PO number provided by the COOP if you have it or use an internal reference number
![]()
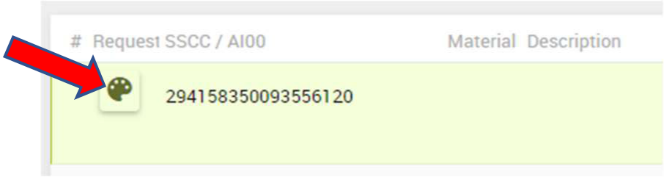
Complete the rest of the fields. Click on the icon here indicated by the arrow and select SSCC to generate a pallet number
REQUEST SSCC /AI00
Material Mat. Descr
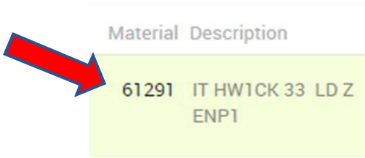
Using the TAB key to move forward, in the field below indicated type the COOP material code according to the product being packed (see the list of material codes provided by the COOP)
Crea. Qty: quantity of packs on the pallet
![]()
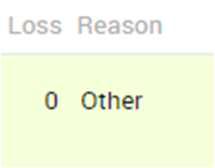
Loss: always type 0
Reason: select Other
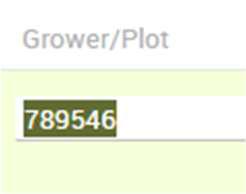
Grower / Plot / Parcel: select the Grower Code from the dropdown list (If it is missing, please check the Due Diligence portal)
Block: select the Block from the dropdown list (If it is missing, please check the Due Diligence portal)
![]()
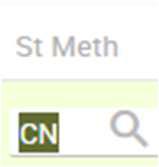
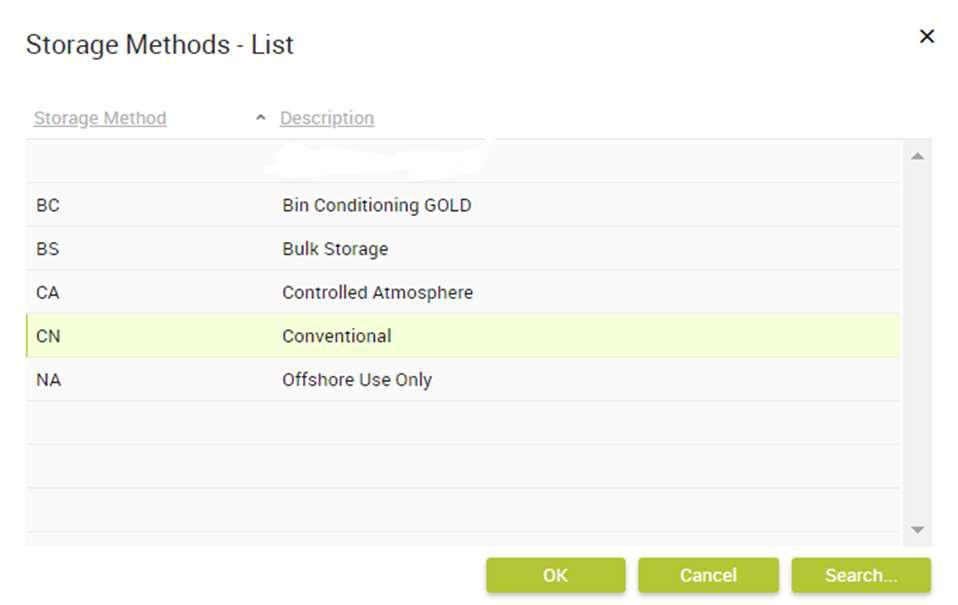
St. Met (Storage Method): choose between CA (Controlled Atmosphere) or CN (Conventional)
St Cat (Storage Category): Always select a storage cat, when you do not know or no QC has been done, c U
![]()
Picked: this is the first day of Harvest

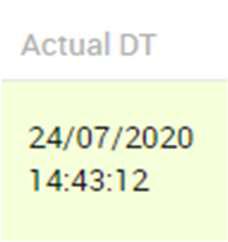
Actual DT (Date Time): this is the date and time of the end of the packing job.
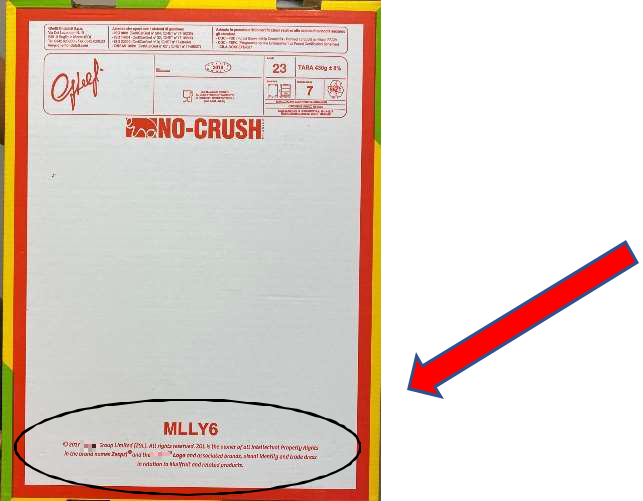
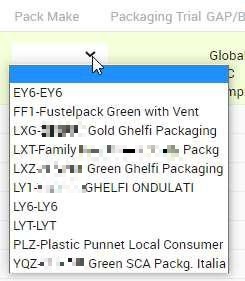
Pack Make: select the packaging supplier from the dropdown list. You can find the code underneath the cardboard box
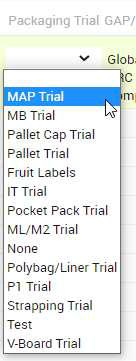
Packaging Trial: if there is any packaging trial, please select the relevant one from the list
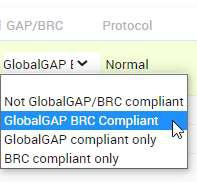
GAP/BRC: select the one that applies from the dropdown list. Usually GlobalGAP BRC Compliant
Protocol: always select NORMAL

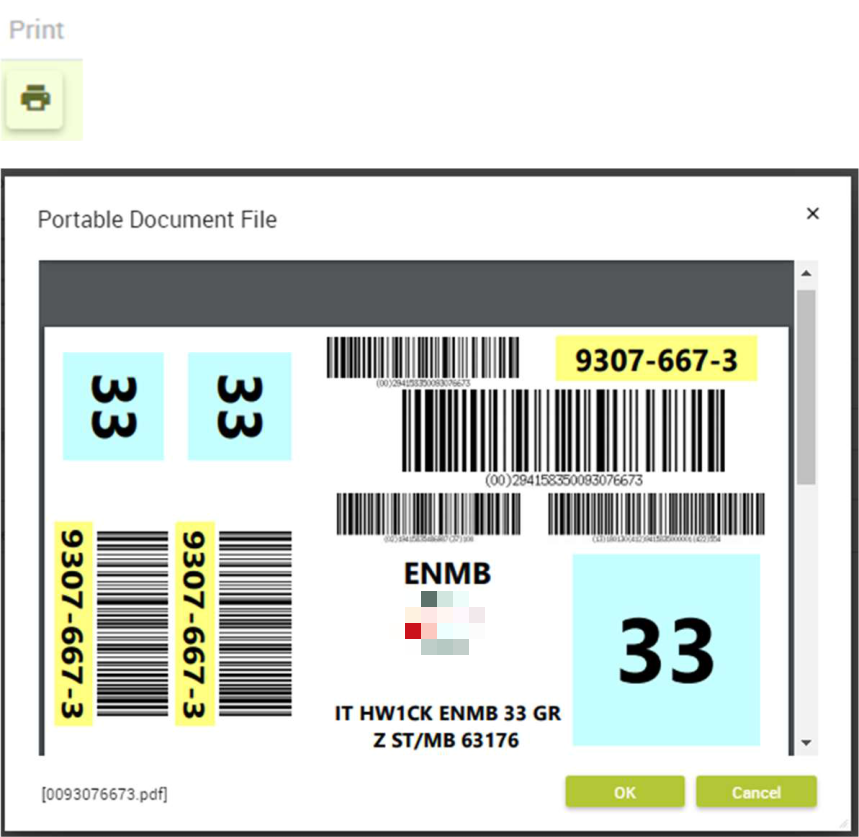
Press TAB key to go through the fields until cursor goes to the next row. At this stage, the Stock Unit Card is automatically saved and it can be printed by clicking on the icon printer.
Please remember to always print a new Stock Unit Card in case of any modification to an existing pallet (change of Grower, size, etc.) and physical apply the new card to the Stock Unit.
MULTI GROWER Stock Unit Card CREATION

In case of a mixed pallet (more than one grower in the same pallet), enter the same SSCC number (see line 1 and 2 in the example above), and indicate the number of boxes for each Grower.
BULK CREATION
In cases where identical Stock Unit Cards need to be created, the function BULK CREATIONS can be used. This provides the possibility to create several pallets with the same characteristics at once.
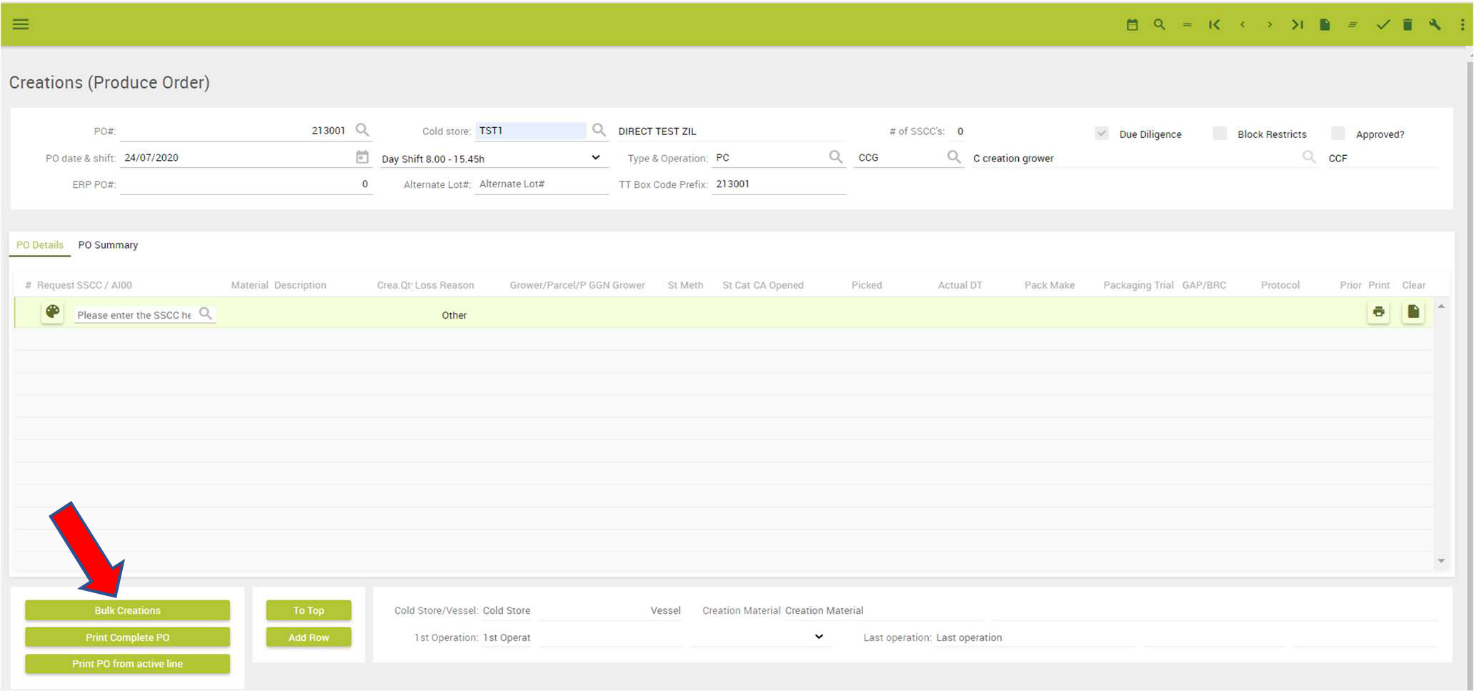
Click on Bulk Creations

The following screen will be displayed:
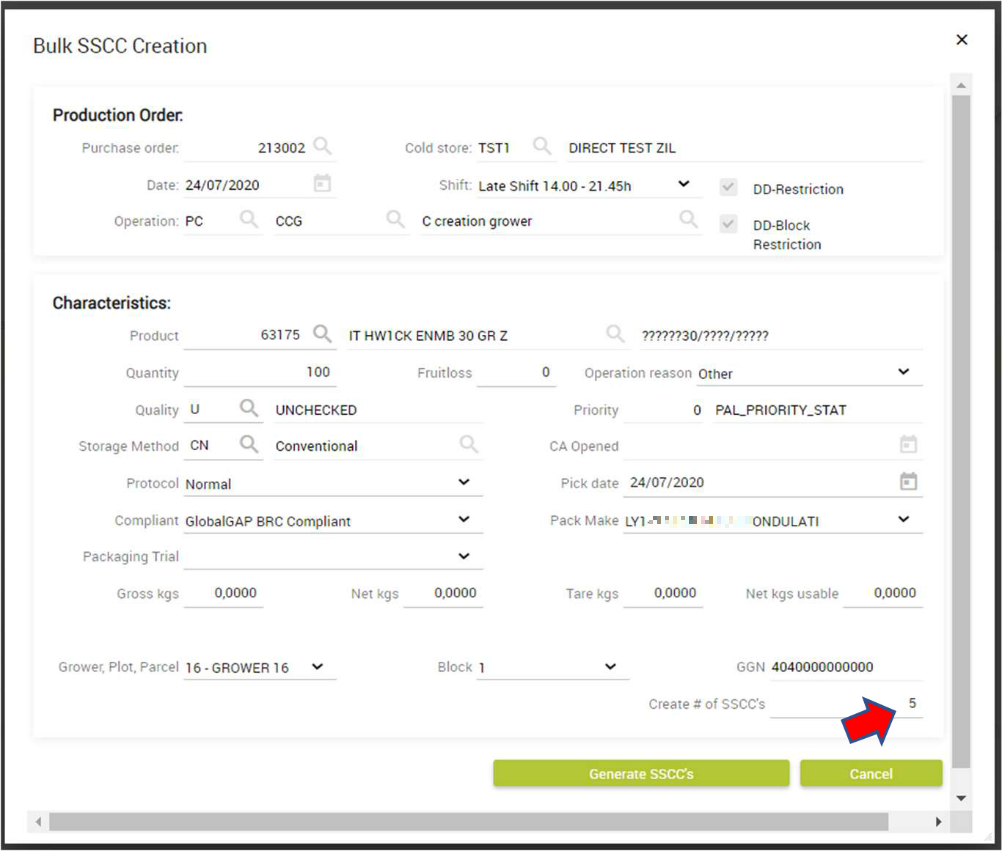
Complete all fields as in the example above, using the Tab key to move forward. In the Create # of SSCC’s filed enter the quantity of Stock Unit Cards that need to be created and then click on GENERATE SSCC’s

A text message will pop up as in the example below:
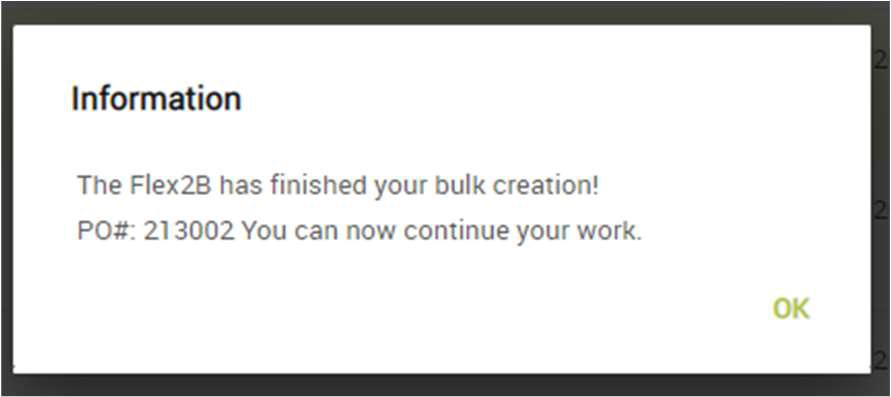
At this point all the pallet numbers massively created will be displayed.

Now the complete PO can be printed choosing PRINT COMPLETE PO. If only a selection of Stock Unit Cards must be printed, select required line and then press PRINT PO FROM ACTIVE LINE.

3.2 Stock Unit Card Deletion (Produce Depletions)
Select OPERATIONS – SSCC MANAGEMENT – PRODUCE DEPLETIONS from the Menu
Leave the PO# box blank and use the Tab key to move forward. Type or select the correct Cold store.
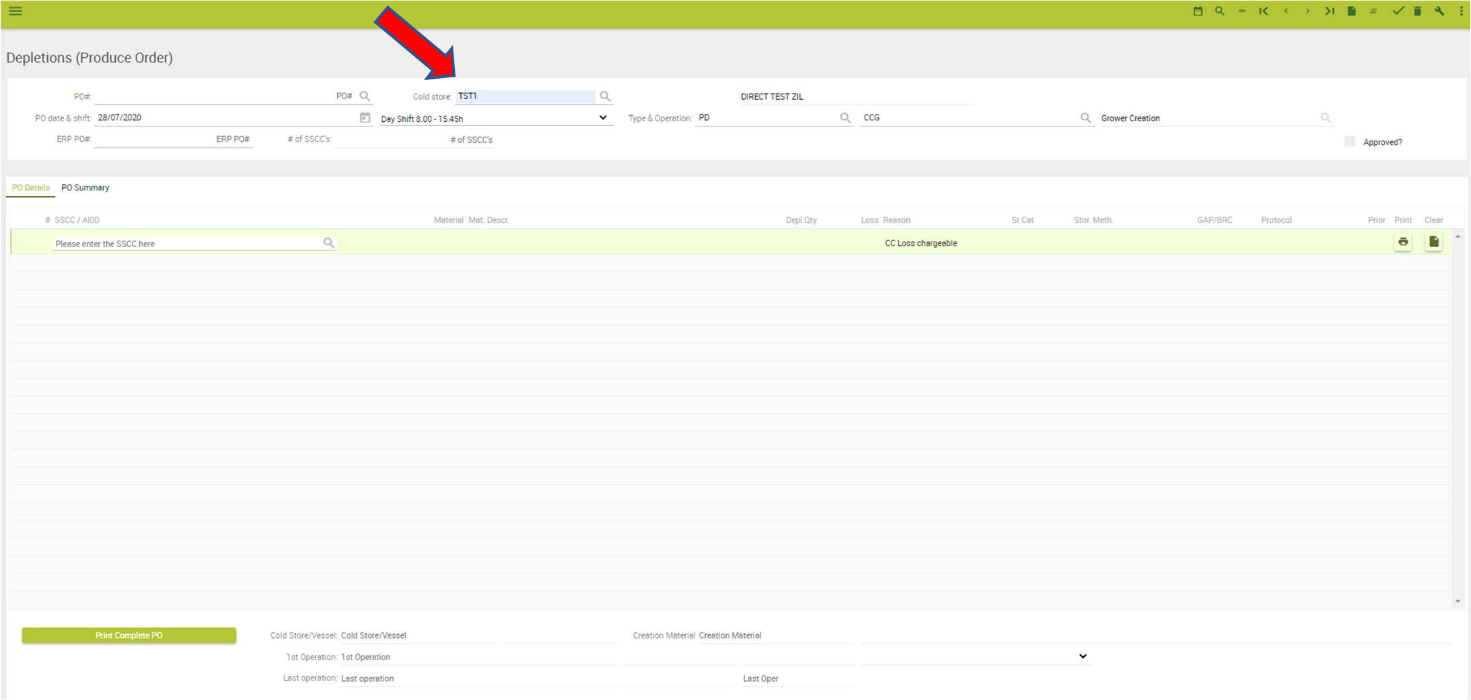
PO date & shift: date and shift can be simply left as automatically generated.
Type & Operation: Type PD (Pallet Depletion) e CCG (Grower Creation)
In the ERP PO# box initial Stock Unit Card number can be entered, but it is not compulsory to fill this field.
Leaving the field blank, it will be automatically populated with ‘0’.
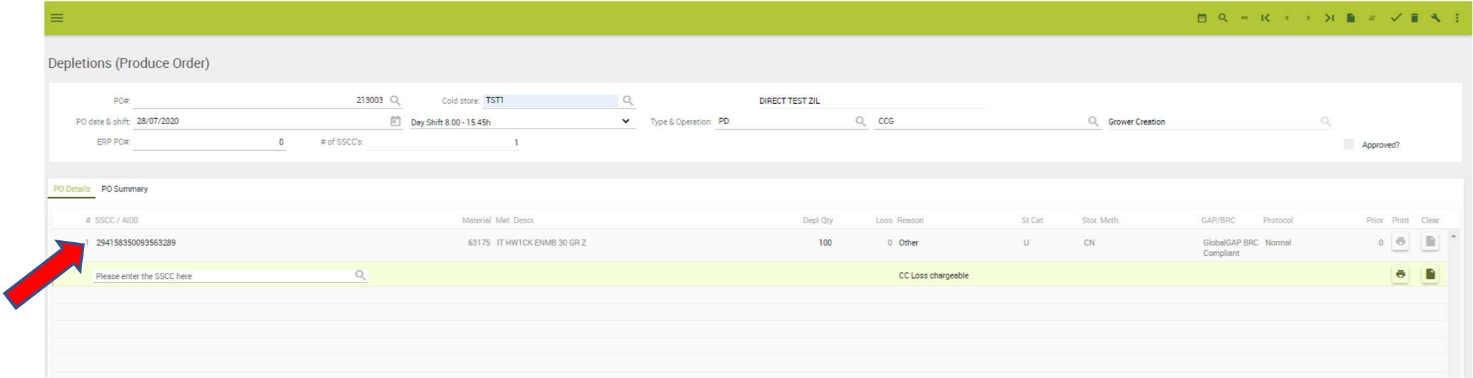
Scan the barcode of each pallet to be deleted or manually type the pallet number in the ‘SSCC/AI00’ field. Move forward with the ‘tab’ key. The material code should be automatically populated, in any case please make sure it is correct. Indicate the number of boxes/packs to delete on the pallet. All other information will be automatically populated by using the Tab key, to move forward.
To delete a second pallet, move to the following row and repeat the above descripted operation. Once every single pallet to be erased has been entered, click on the icon on the top right to save the operation ![]()
To check that a pallet has been deleted in Flex2b, please refer to the following section ‘3.3 Stock Unit Enquiry’.
3.3 Stock Unit Enquiry
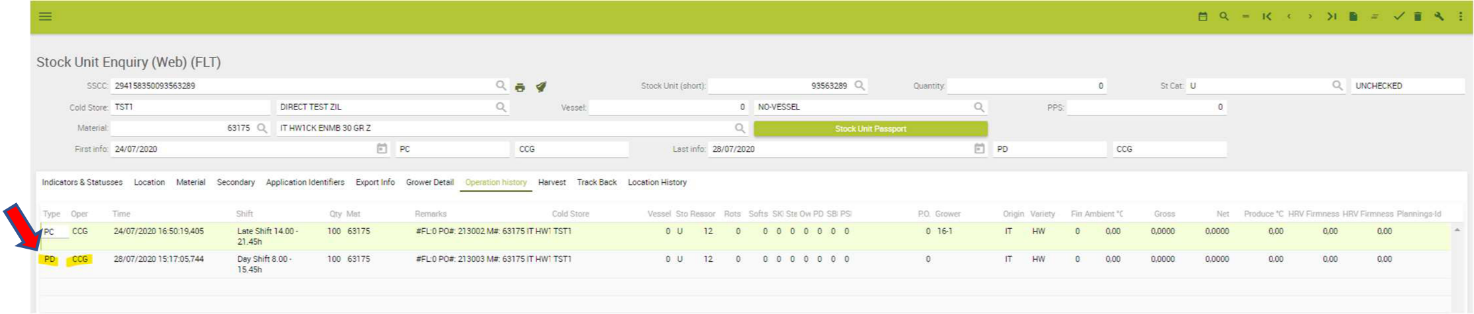
Select OPERATIONS – SSCC MANAGEMENT – STOCK UNIT ENQUIRY from the MENU
Scan the bar code or manually type the Stock Unit Card number, click ‘=’ in the menu on the top right to view the pallet info.
Clicking on the ‘Operation History’ tab to see all the operations performed on a single pallet.
PD CCG indicates that the pallet has been deleted
4. Delivery/ To Loadout The Pallets In Flex2b
4.1 Truck Delivery - Europe
4.1.1 Set Firmness
Go to MENU – QUALITY – HARVEST QUALITY – HARVEST QUALITY FIRMNESS
Enter the PO# reference number of the pallets or search in the list with the magnifying glass and indicate the firmness of each pallet in the Pre-conditioned column. This operation is to be done only for deliveries into Europe.

4.1.2 To Loadout The Pallets In Flex2b (Europe)
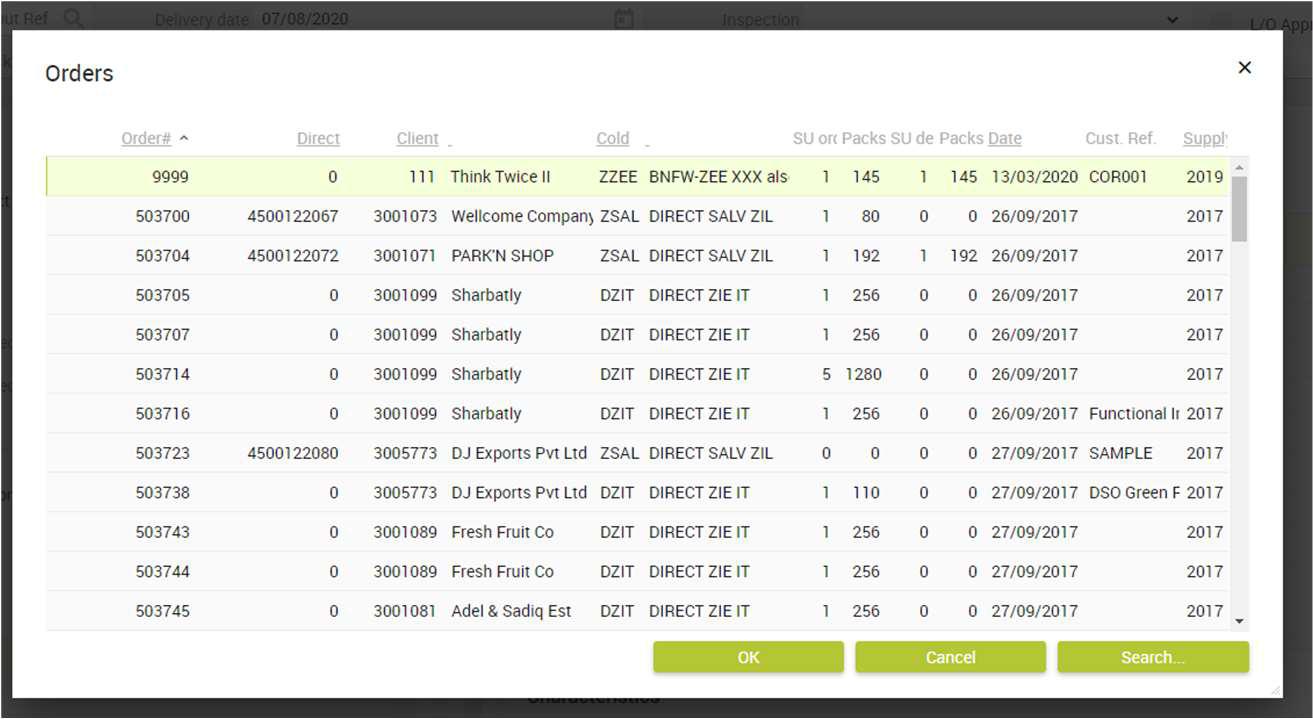
From the MENU go to OPERATIONS – DELIVERY MANAGEMENT – DELIVERY and the Delivery (Classic) screen will open.

Type the FLEX2B order number or select the Order in the list by clicking on the magnifying glass.
Please fill in the fill in the following fields:
LOADOUT REF: You can use this field to type your internal order reference number or any reference number
DELIVERY DATE: the date is automatically populated with the current date
INSPECTION: to indicate the state of the truck. It must always be Hygienic / Clean
TRUCK DOC: enter 0
CAR ID: insert the registration number (plate) of the truck
CMR PREFIX + MAIN: report the CMR number where present and populate the rest of the fields with a *
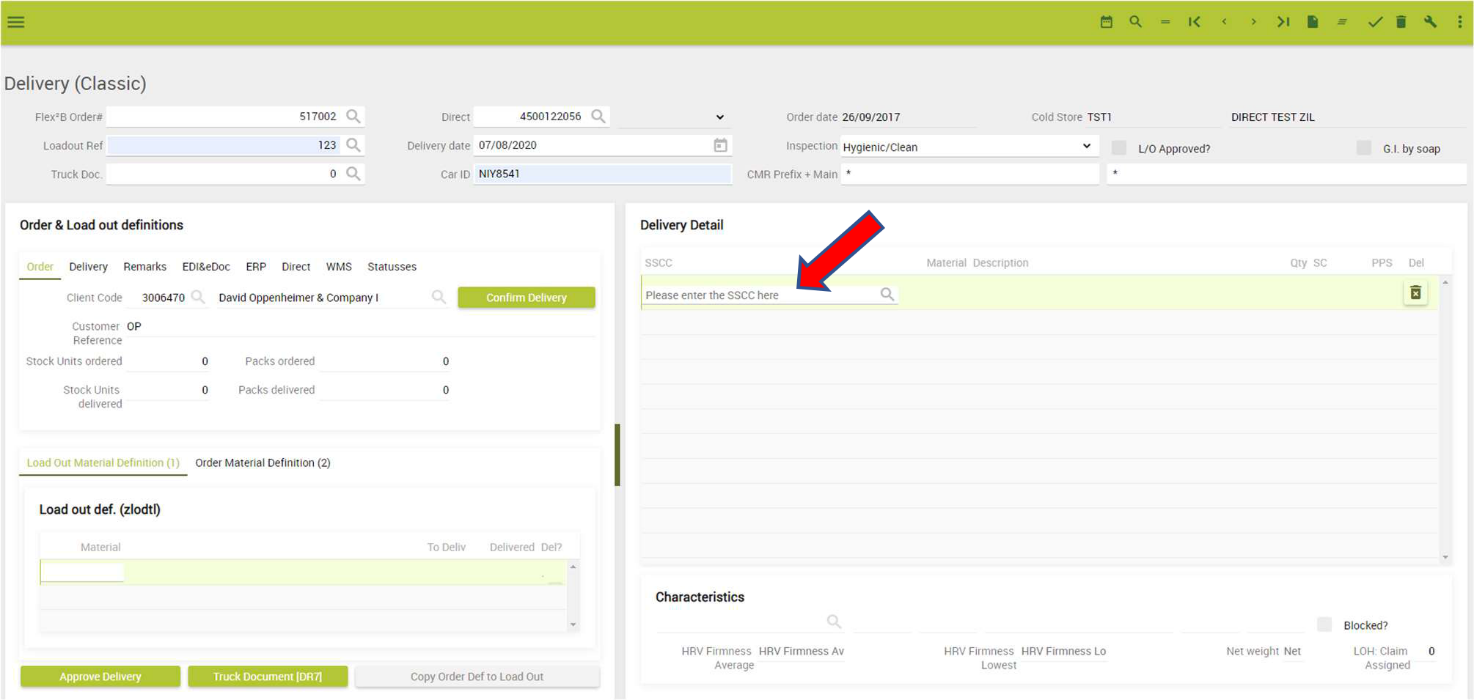
In the DELIVERY DETAIL part enter the pallet numbers or scan the barcodes of the pallets to be loaded or select them using the magnifying glass.
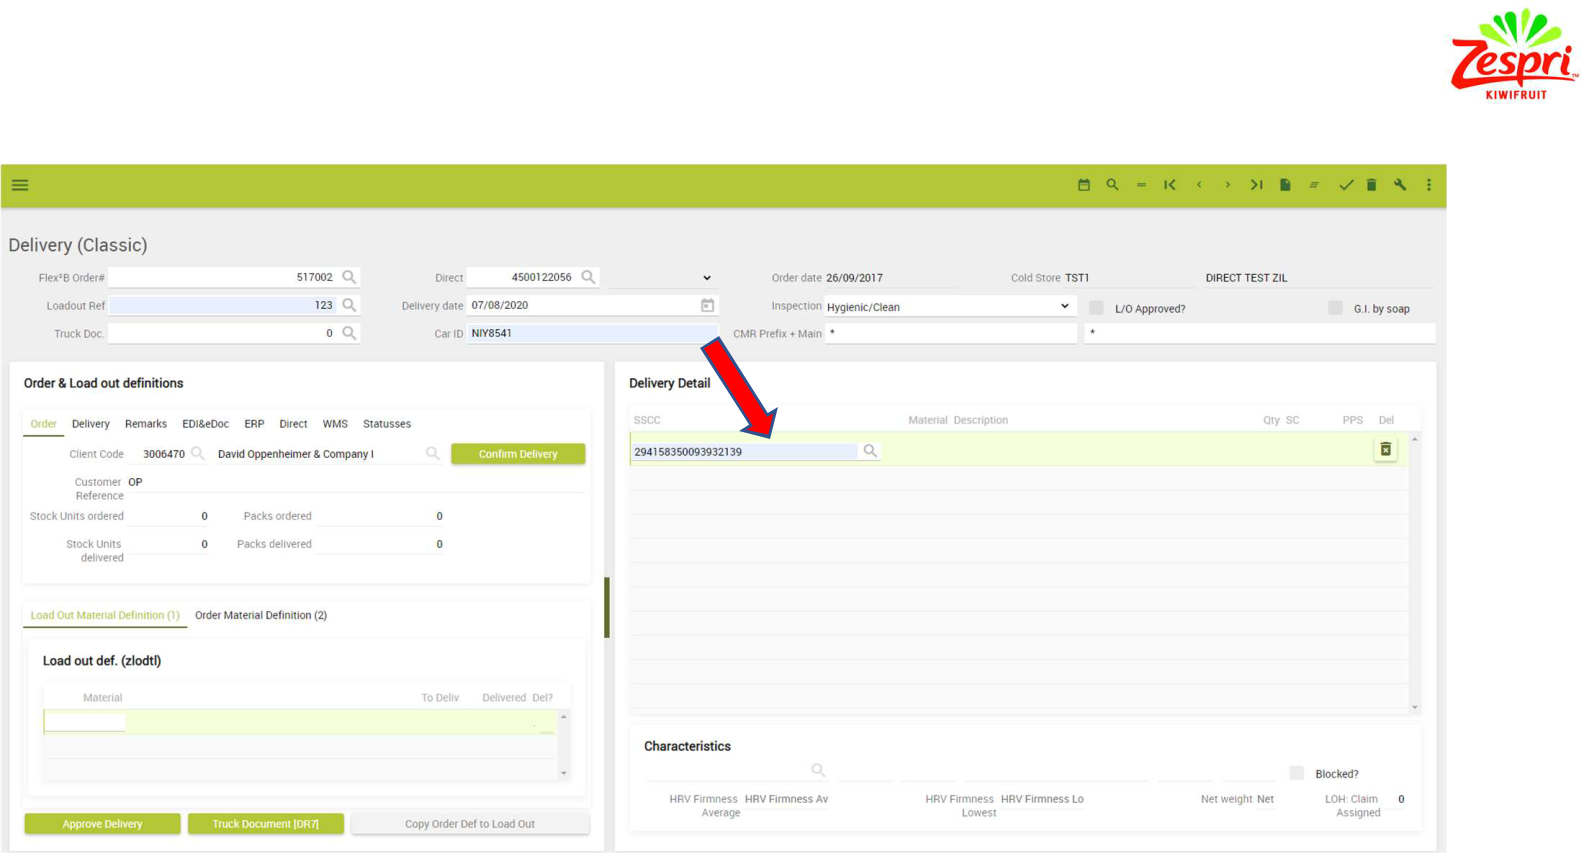
Once you have scanned all the pallets and the loading process is finished, click on APPROVE DELIVERY.

4.2 Containers Delivery - Export
4.2.1 To Loadout The Pallets In Flex2b (Export)
For ocean freights, go to MENU – OPERATIONS – EXPORT MANAGEMENT – DELIVERY FOR EXPORT OR CONTAINERS and the following screen will open:
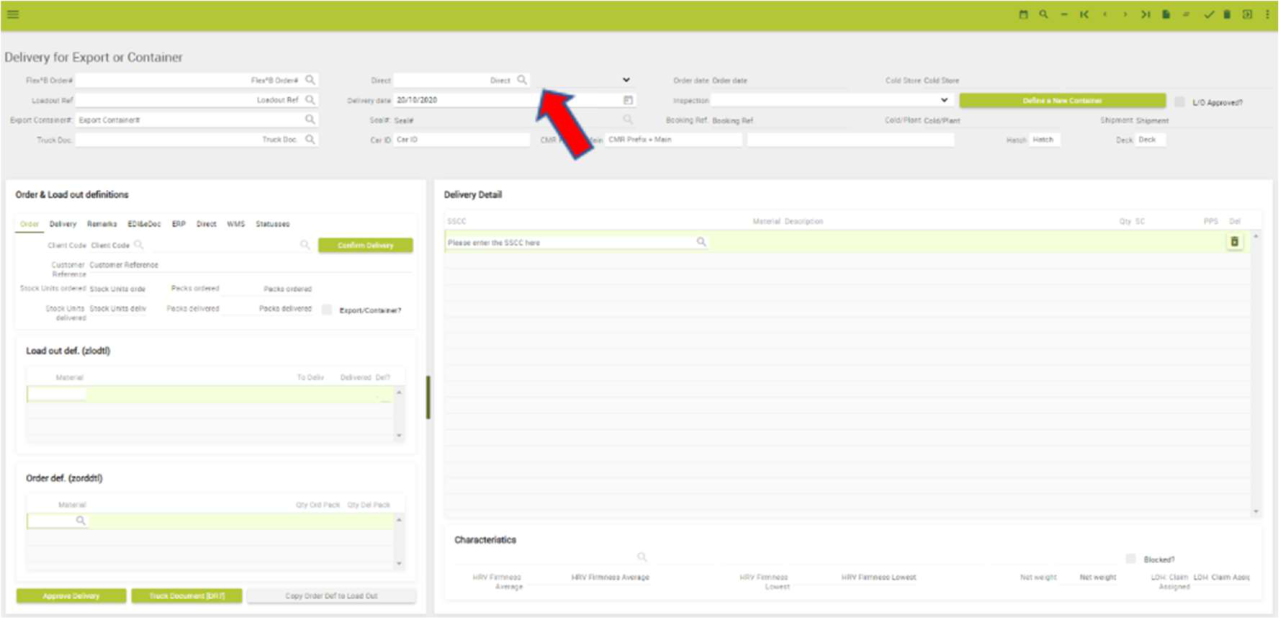
Proceed with entering the Order number and move forward with the TAB key.
Create a Loadout ref (it can be the delivery note number, PO number, or an internal one)
Delivery date: the date will be populated automatically Inspection: select
Hygienic/Clean
Click on Define a New Container

At this stage a new window will open. Please complete it as in the example below filling all the compulsory fields marked with a *.
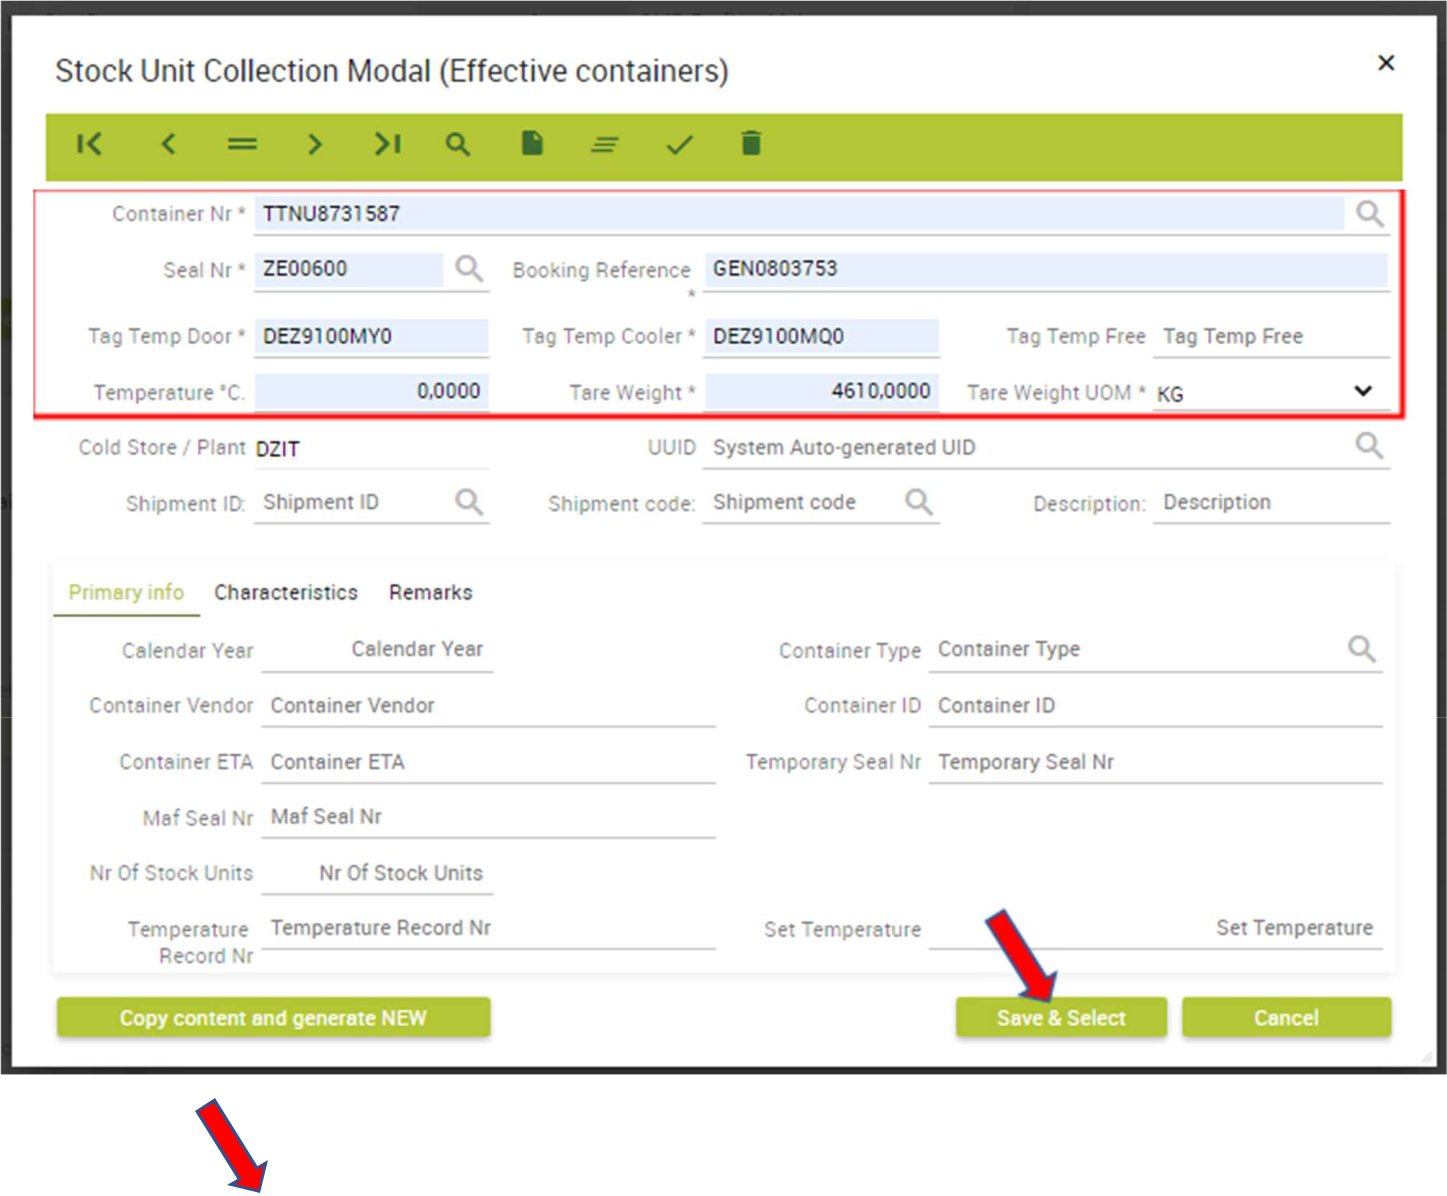
![]()
Then click on
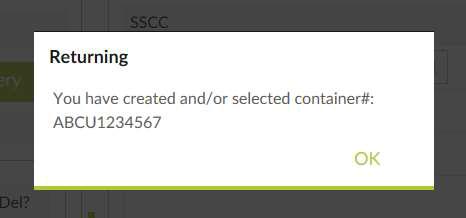
The UUID field should be automatically populated.
At this point the following message will pop up.
Press ‘OK’:
The following fields need to be populated:
TRUCK DOC: enter 0
CAR ID: insert the registration number (number plate) of the truck
CMR PREFIX + MAIN: report the CMR number where present and populate the rest of the fields with a *
In the SSCC field please type or scan all the pallets about to be loaded on the container.
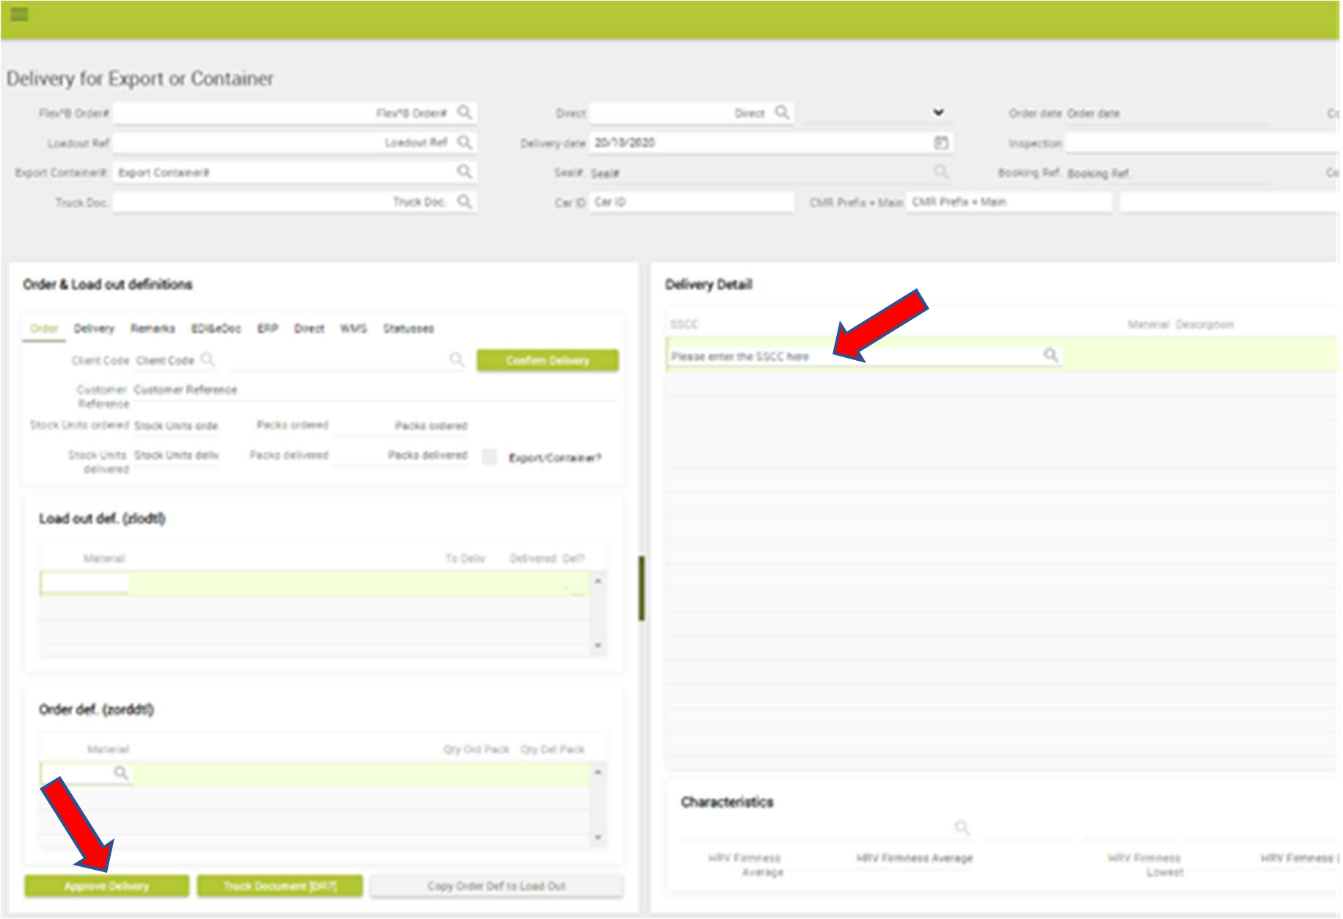
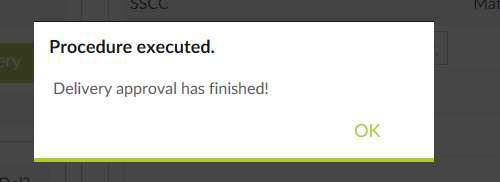
Finally, DO NOT FORGET TO FINALIZE OPERATIONS CLICKING ON APPROVE DELIVERY!!!
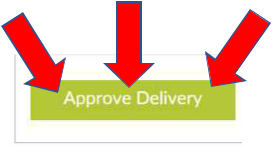
At this point the following message will pop up. Press ‘OK’.
For export orders go to MENU – OPERATIONS – EXPORT MANAGEMENT – TRANSPORT/SHIPMENT and the following screen will open.
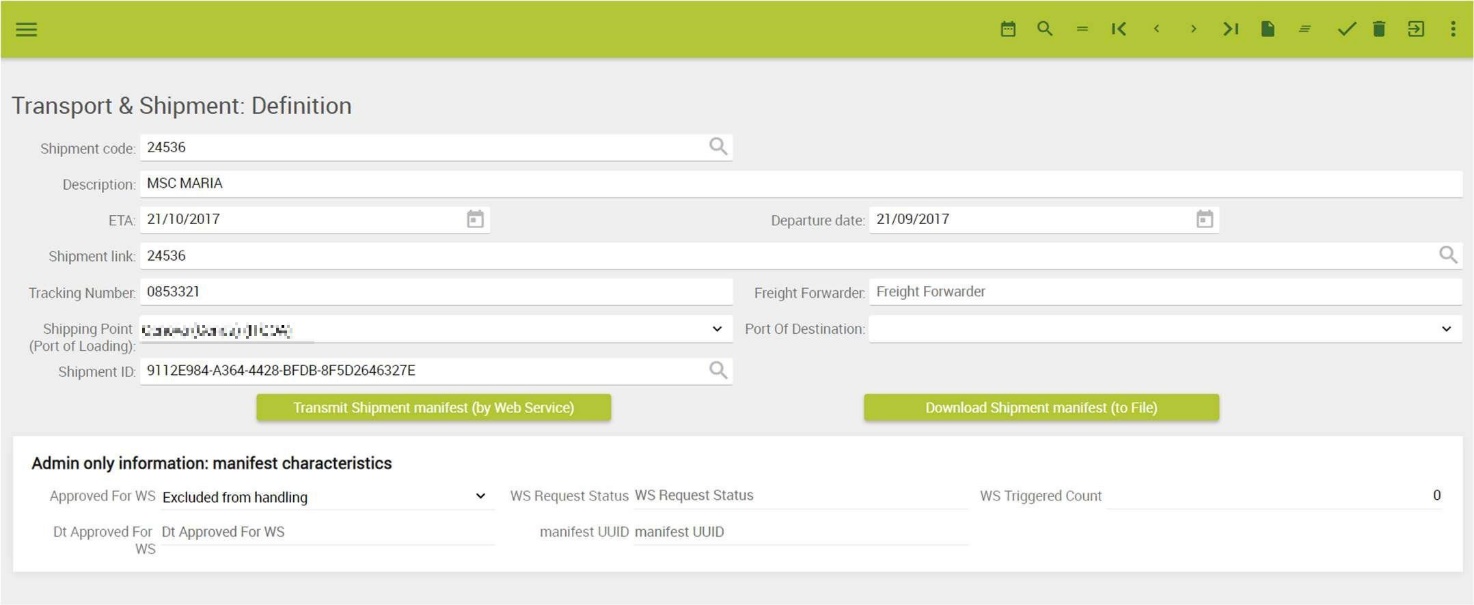
Operator must complete the following fields manually:
- Shipment code: enter shipment number (PO Number in case of Singapore scenario)
- Description: enter vessel name
- ETA: enter the estimated time of arrival of the vessel
- Departure date: enter the vessel departure date
- Shipment link: enter shipment number (PO Number in case of Singapore scenario)
- Tracking number: leave it blank
- Freight forwarder: enter the name of the freight forwarding company
- Shipping point (Port of loading): enter the IATA code for point of departure (port of loading). E.g.: ITGOA (Port of Genoa). Please find the complete list of port codes shown in Appendix, page 26.
- Port of destination: enter the IATA code for point of arrival (port of arrival). E.g.: CATOR (Port of Toronto, Canada). Please find the complete list of port codes shown in Appendix, page 26.
- Shipment ID: leave it blank – it will be auto populated by the system
To finish the operation, click on ![]() (‘Save’) in the menu on the top right.
(‘Save’) in the menu on the top right.
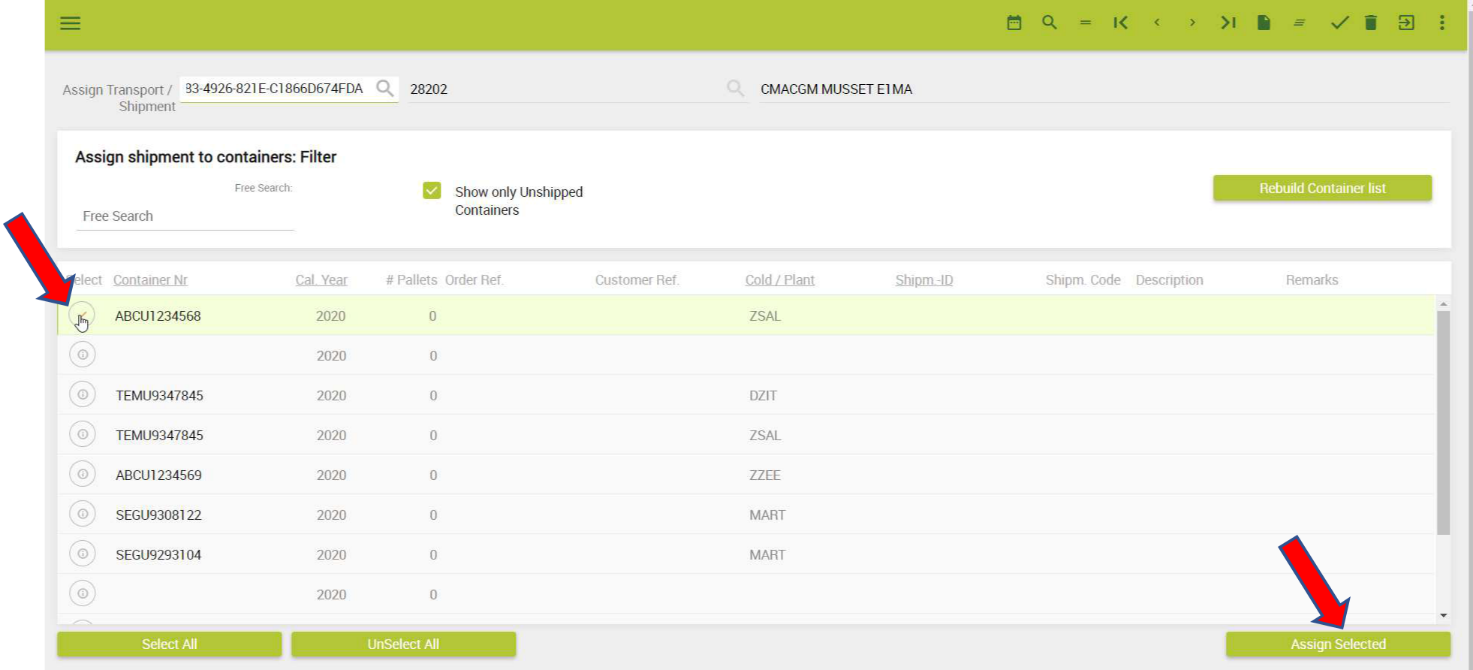
4.2.3 Assign Shipments To Containers
Go to MENU – OPERATIONS – EXPORT MANAGEMENT – ASSIGN SHIPMENTS TO CONTAINERS
Click on the magnifying glass to find the shipment number in the displayed list.
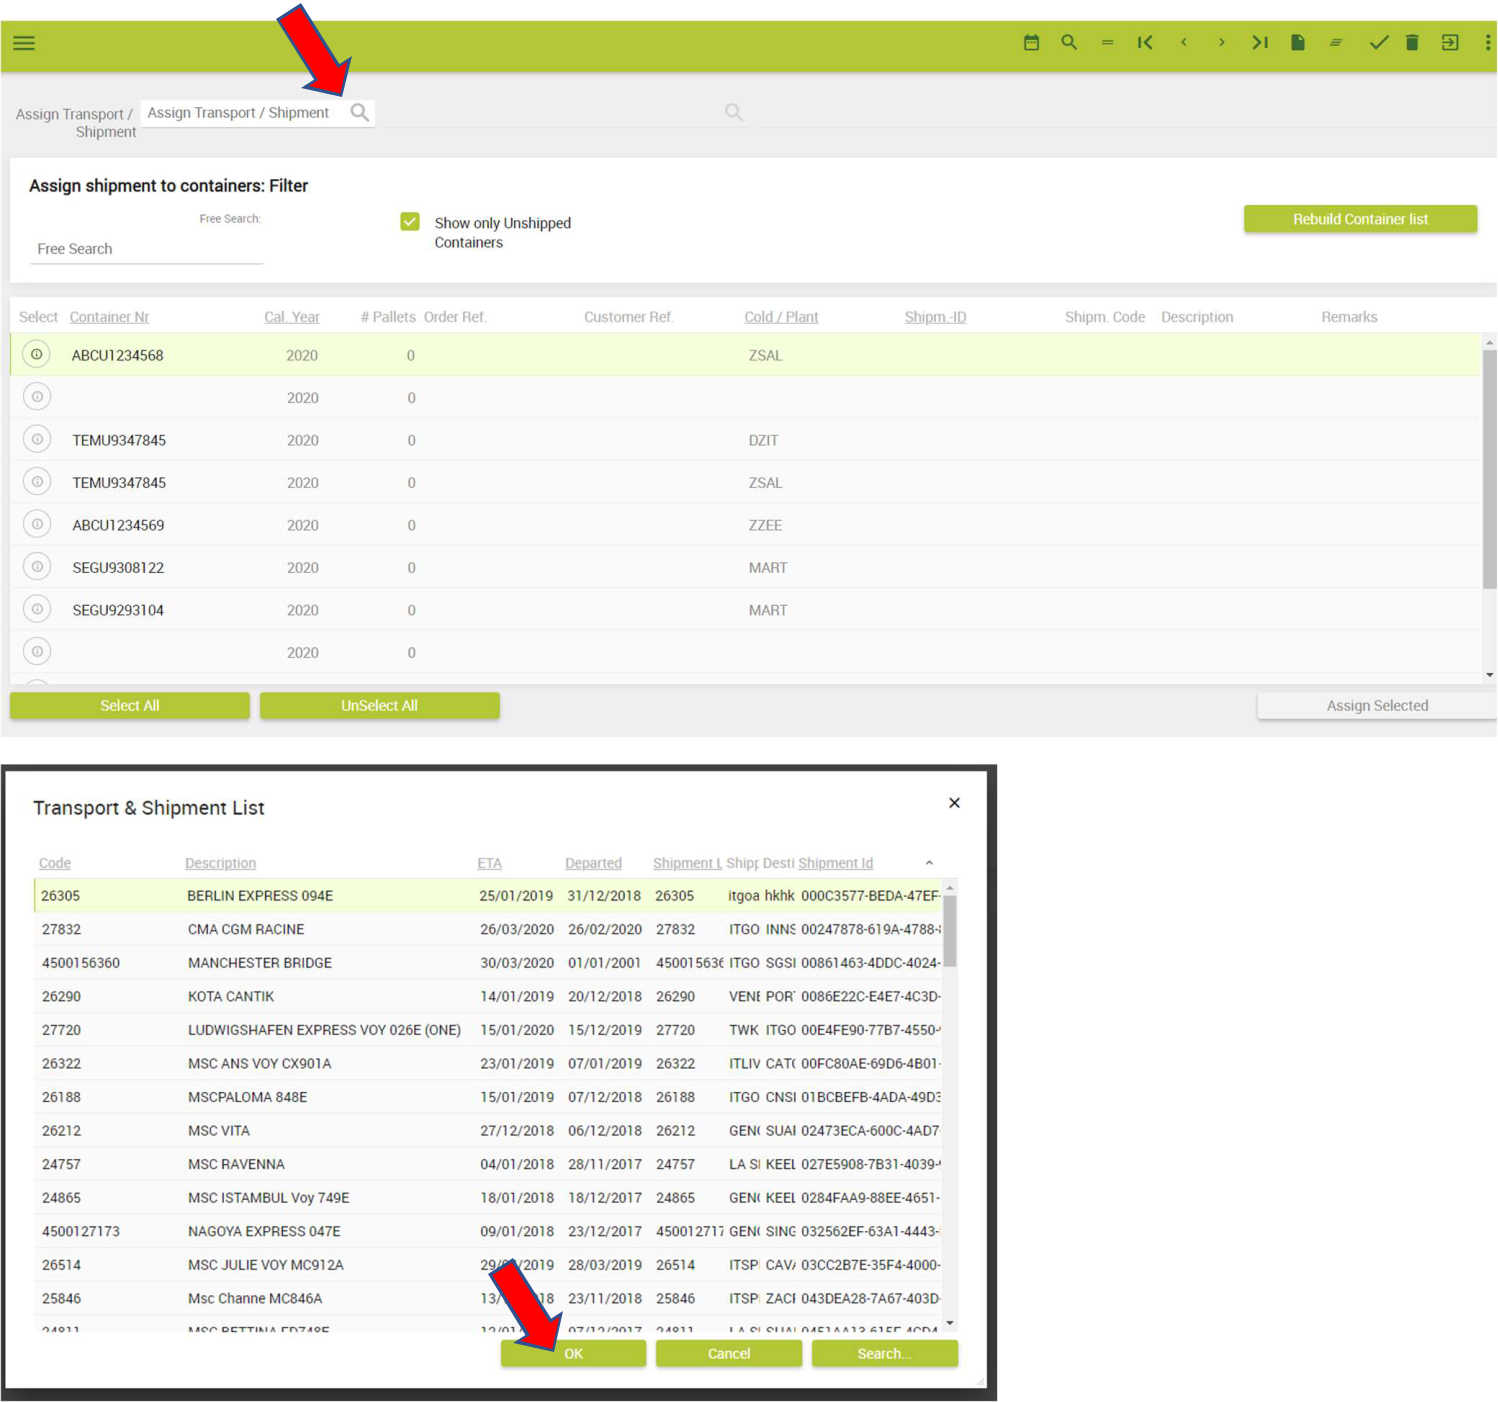
Select shipment number, then press ‘OK’.
The container number previously created should be displayed on the list shown on the screen. Select it by highlighting it, then click on ‘Assign Selected’.
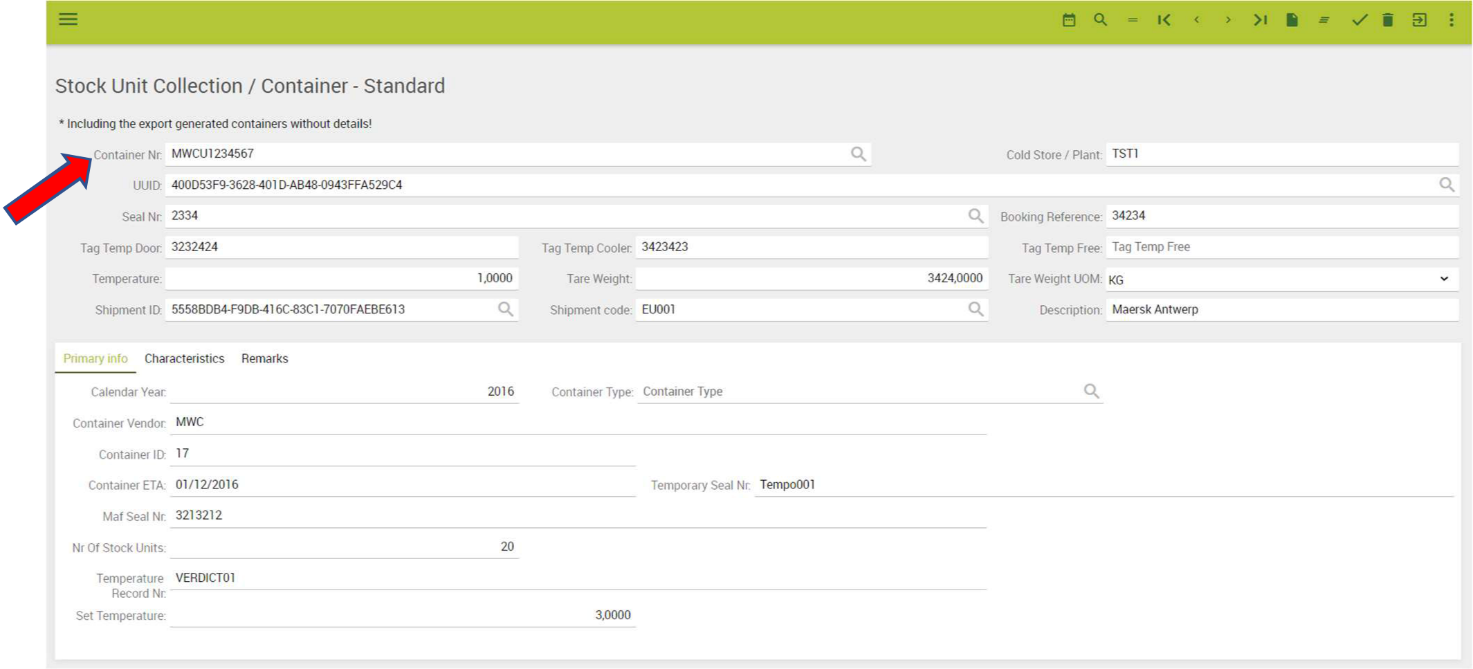
4.2.4 Stock Unit Collector / Container - Standard
To see the information on a particular container that you have created. Enter the container number in the ‘Container Nr’ field and then click ‘=’ on the menu in the top right.
APPENDIX – Some Port Codes List
i.e. DEPARTURE PORTS SOUTH EUROPE
|
Country |
|
Port Code |
Port Name |
|
FR |
|
FRBOD |
Bordeaux |
|
FR |
|
FRFOS |
Fos-Sur-Mer |
|
IT |
|
ITAOI |
Ancona |
|
IT |
|
ITCVV |
Civitavecchia |
|
IT |
|
ITGIT |
Gioia Tauro |
|
IT |
|
ITGOA |
Genova (Genoa) |
|
IT |
|
ITLIV |
Livorno |
|
IT |
|
ITNAP |
Napoli (Naples) |
|
IT |
|
ITRAN |
Ravenna |
|
IT |
|
ITSAL |
Salerno |
|
IT |
|
ITSPE |
La Spezia |
|
IT |
|
ITTAR |
Taranto |
|
IT |
|
ITTRS |
Trieste |
|
IT |
|
ITVCE |
Venezia (Venice) |
|
IT |
|
ITVDL |
Vado Ligure |
|
GR |
|
GRPIR |
Piraeus |
|
GR |
|
GRSKG |
Thessaloniki |
i.e. DESTINATION PORTS OVERSEAS
|
Country |
|
Port Code |
Port Name |
|
|
AE |
|
AEJEA |
Jebel Ali |
|
|
BH |
|
BHBAH |
Bahrain |
|
|
BR |
|
BRIOA |
Itapoa |
|
|
BR |
|
BRSSZ |
Santos |
|
|
BR |
|
BRSUA |
Suape |
|
|
CA |
|
CAMTR |
Montreal |
|
|
CA |
|
CATOR |
Toronto |
|
|
CA |
|
CAVAN |
Vancouver |
|
|
CN |
|
CNSHG |
Shanghai |
|
|
CN |
|
CNTXG |
Xingang |
|
|
CN |
|
CNYTN |
YanTian |
|
|
HK |
|
HKHKG |
Hong Kong |
|
|
ID |
|
IDJKT |
Jakarta |
|
|
ID |
|
IDSUB |
Surabaya |
|
|
ID |
|
IDBLW |
Belawan |
|
|
IN |
|
INKAT |
Kattupalli |
|
|
IN |
|
INMAA |
Chennai |
|
|
IN |
|
INNSA |
Nhava Sheva |
|
|
KW |
|
KWSWK |
Shuwaikh |
|
|
MX |
|
MXVER |
Vera Cruz |
|
|
MY |
|
MYPEN |
Penang |
|
|
MY |
|
MYPKG |
Port Kelang |
|
|
MY |
|
MYBKI |
Kota Kinabalu |
|
|
MY |
|
MYKCH |
Kuching |
|
|
FR |
|
REPDG |
Reunion |
|
|
SG |
|
SGSIN |
Singapore |
|
|
TW |
|
TWKEL |
Keelung |
|
|
US |
|
USLGB |
Long Beach |
|
|
US |
|
USNYC |
New York |
|
|
VN |
|
VNHPH |
Hai Phong |
|
|
VN |
|
VNSGN |
Ho Chi Minh City |
|
|
ZA |
|
ZACPT |
Cape Town |
|
|
ZA |
|
ZADUR |
Durban |
|
|
|
|
|
|
|
The list is enormous. We found an interesting link to enquiry the codes for your own specific location.
Link external